| Important |
• Do not use a pen for more than 28 days after first use. After 28 days throw away (dispose of) the pen, even if the pen still has medicine in it.
• Do not place the pen in water or any other liquid.
• Keep your pen and needles out of the reach of children.
• Do not use if any part of your pen appears broken or damaged.
• If you drop your pen, prime it before you use it again to make sure the pen still works correctly (see step 3. Prime Your Pen).
• Do not take BYNFEZIA PEN solution out of the pen and put it into a syringe.
• Do not share your pen or needles with another person. You may give an infection to them or get an infection from them.
• Do not remove the outer needle cover or inner needle cover until you are ready to inject.
• Do not press the injection button unless a needle is attached to the pen. |
| How should I store my BYNFEZIA PEN? |
Before First Use:
• Store new unused pens in the refrigerator between 36°F to 46°F (2°C to 8°C) and store in the outer carton in order to protect from light.
• Do not freeze. Throw away (dispose of) the pen if it has been frozen.
• Do not store the pen in direct sunlight.
After First Use or During Use:
• Store the pen at room temperature between 68°F to 77°F (20°C to 25°C) for up to 28 days.
• Store the pen with the pen cap on.
• Throw away (dispose of) the pen 28 days after first use in a sharps container, even if the pen still has medicine in it (see step 6. Additional Disposal Information).
• Do not store a pen with a needle attached. |
| How do I give a dose larger than 200 mcg (more than 1 injection)? |
1. Turn the dose set knob to 200 mcg (highest dose setting) and give the first injection. Choose a different injection site for each injection at least 2 inches from the area you used for your last injection.
2. Calculate the remaining dose by subtracting 200 mcg from the prescribed dose.
3. Turn the dose set knob to the line for your remaining dose up to the highest dose setting of 200 mcg. Give the second injection at least 2 inches away from the first injection.
4. You may need more injections to give your total prescribed dose (see examples below).
See the following examples to give a total dose larger than 200 mcg:
|
| Example Dose | Steps to give a total dose larger than 200 mcg | Number of injections needed to give the total dose |
| For example, if your total dose is 300 mcg |
- Turn the dose set knob to 200 mcg for your first injection.
- Your remaining dose is 100 mcg.
- For the second injection, turn your dose set knob to 100 mcg to give the remaining dose.
|
2 |
| For example, if your total dose is 450 mcg |
- Turn the dose set knob to 200 mcg for your first injection.
- Your remaining dose is 250 mcg.
- Turn the dose set knob to 200 mcg for your second injection.
- Your remaining dose is 50 mcg.
- For the third injection, turn your dose set knob to 50 mcg to give the remaining dose.
|
3 |
1. Check the Pen
|
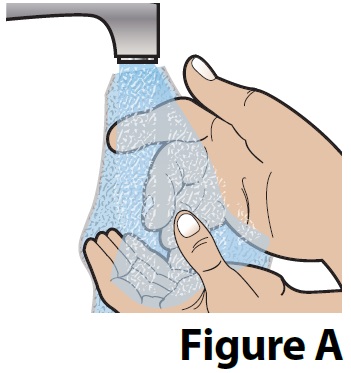
A. Wash your hands with soap and water (Figure A).
| 
|
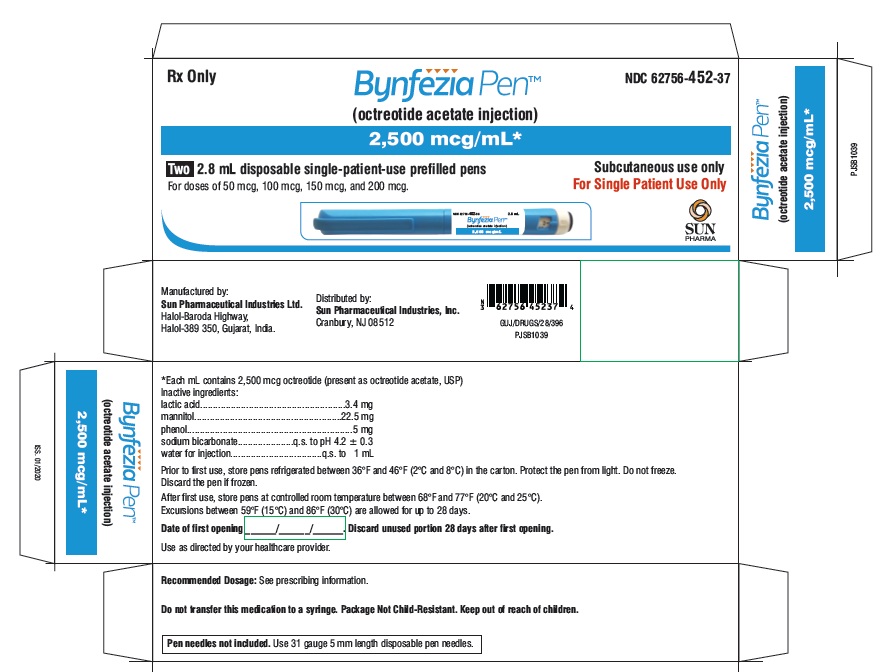
B. Check the expiration (EXP) date (Figure B).
- Check the pen label to make sure the expiration date has not passed.
Do not use if the expiration date has passed. | 
|
C. Pull the pen cap straight off the pen (Figure C).
|  |
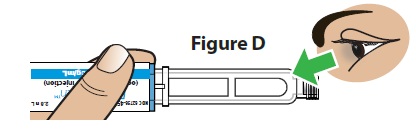
D. Check the medicine (Figure D).
- The medicine should be clear and colorless. You may see small air bubbles in the pen, which is normal and will not affect the dose.
Do not use if the medicine looks cloudy, colored, or has lumps or particles in it. The pen cartridge may look empty because the medicine is clear and colorless.
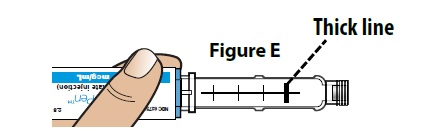
- Make sure you have enough medicine left in the pen to inject the full dose. When the plunger moves pass the thick line, your pen is almost empty (Figure E). If the dose set knob does not let you dial your prescribed dose, this means there is not enough medicine left in your pen. Throw away (dispose of) the pen and use a new pen for the injection.
| 
|
E. Allow the pen to reach room temperature.
- If the pen was not stored at room temperature between 68°F to 77°F (20°C to 25°C), allow it to reach room temperature for 20 to 30 minutes before injecting. This will reduce the chance of getting a reaction at the injection site.
Do not try to warm the pen by using a heat source such as hot water or microwave.
- See the section "How should I store my BYNFEZIA PEN ?" for more information.
| |
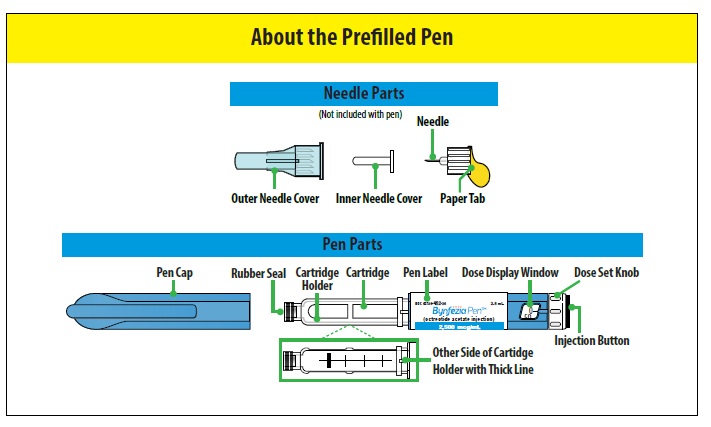
2. Attach a Needle
|
A. Gather the following additional supplies (Figure F):
-
2 alcohol swabs
-
new pen needle
-
sharps container
-
cotton ball
Note: These supplies are not included with the pen. | 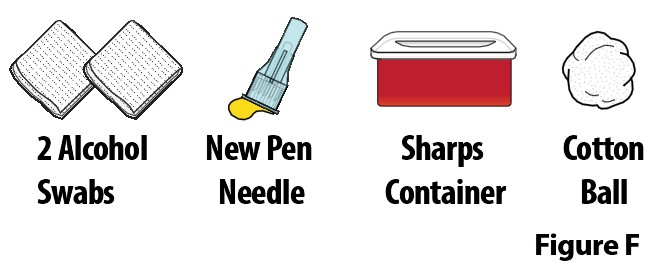 |
B. Wipe the rubber seal on the pen with an alcohol swab (Figure G).
|  |
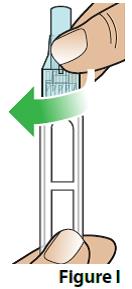
C. Attach a new needle.
- Use only 31 gauge, 5 mm length disposable pen needles. If you have questions about which needle to use, ask your healthcare provider.
- Peel off the paper tab from the needle (Figure H).
- Push the needle with cap straight down onto the pen and screw it on to the pen by turning to the right (clockwise) until the needle feels secure (Figure I).
Do not overtighten the needle. This will make it hard to remove after the injection. | 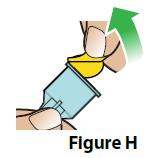
|
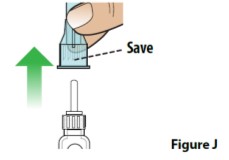
D. Remove the outer needle cover and set it aside (Figure J).
-
Save the outer needle cover for use when you remove the needle in step 6.
| 
|
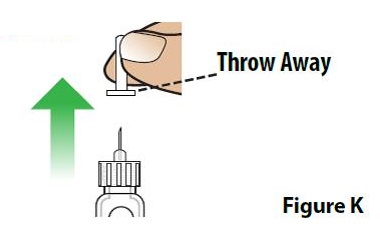
E. Remove the inner needle cover and throw it away (Figure K).
| 
|
Are you using a new pen?
-
If Yes, complete step 3.
-
If No, skip step 3 and go to step 4.
|
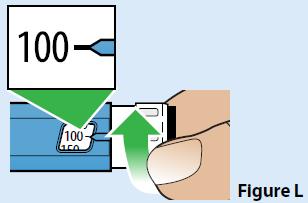
3. Prime Your Pen
|
Note: The following steps are only needed if you are using a new pen for the first time or if you drop the pen.
To prime the pen, follow the steps below to dial the pen to 100 mcg and press the injection button until a stream of medicine comes from the needle tip.
- If you have already primed the pen, go to step 4 to prepare and give the injection.
-
Do not prime the pen before each dose. This will waste medicine.
| |
A. Turn the dose set knob to dial the pen to 100 mcg (Figure L).
|  |
B. Hold the pen with the needle pointing up.
| |
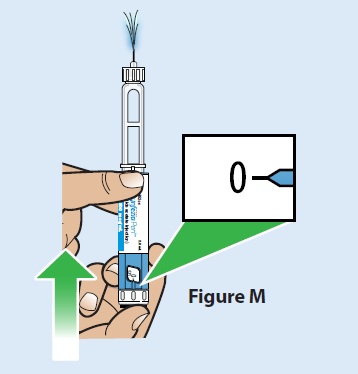
C. Press the injection button all the way in until it stops and the dose display window returns to “0” (Figure M).
|  |
D. A stream of medicine should be seen coming from the needle tip (Figure N).
If you do not see a stream of medicine coming from the needle tip, repeat the priming steps.
If you still do not see a stream of medicine coming from the needle tip after you repeat the priming steps 3 times, the pen may be damaged. Throw away (dispose of) the pen and use a new pen. Call Sun Pharmaceutical Industries, Inc. at 1-800-818-4555or your healthcare provider for help or to get a new pen. | 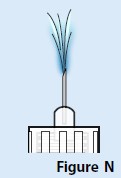 |
4. Prepare the Injection
|
A. Choose an injection site (see Figure O) for injection under the skin (subcutaneous).
-
When giving yourself the injection: Inject into the stomach at least 2 inches away from the belly button (navel) or inject into the front of the middle thighs (Figure O).
-
When giving someone else the injection: you may also inject into the back outer area of the upper arms (Figure O).
-
Always change (rotate) the injection site with each injection. Your injection site should be at least 2 inches away from your last injection site.
Do not inject into moles, scars, birthmarks, or areas where the skin is tender, bruised, red, or hard. | 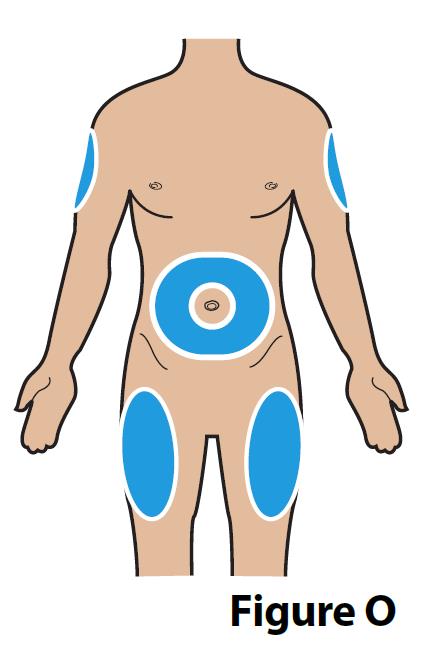 |
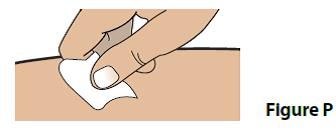
B. Clean your injection site with an alcohol swab (Figure P).
- Wipe the skin with an alcohol swab. Let the injection site dry before you inject your dose.
|  |
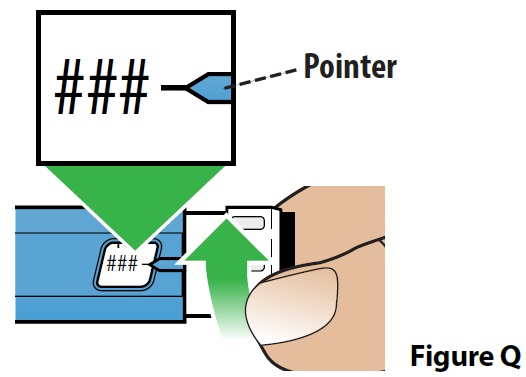
C. Dial your dose (Figure Q).
- Turn the dose set knob until you see the prescribed dose in the dose display window. The dose number and black line should line up with the pointer. The pen can be used to deliver 50 mcg, 100 mcg, 150 mcg and 200 mcg doses.
If your prescribed dose is more than 200 mcg, see the section “How should I give a dose larger than 200 mcg (more than 1 injection)?” in these instructions.
- It is normal to hear a “clicking” sound as you turn the dose set knob.
- If you accidentally dial past the prescribed dose, turn the dose set knob back down to the correct dose.
|  |
Note: The pen cannot be dialed past the number of micrograms (mcgs) of medicine left in the pen. If the pen does not have enough medicine to give the full dose, throw away (dispose of) the pen and use a new one.
| |
| 5. Give the Injection |
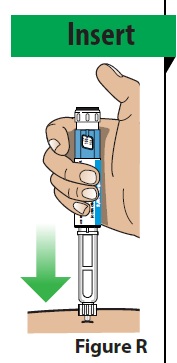
A. Insert the needle straight into the injection site (Figure R).
|  |
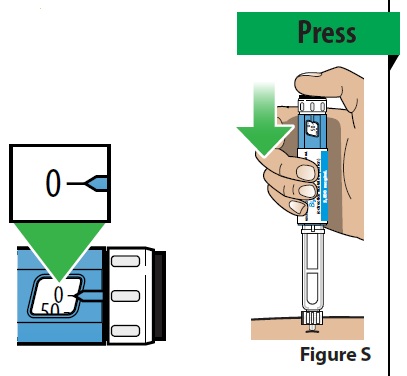
B. Deliver your dose.
- Deliver your dose by slowly pressing the injection button all the way down until it stops. The number in the dose display window will go back to “0” when the injection is complete (Figure S).
|  |
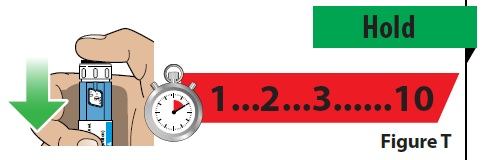
C. Continue to hold the injection button down and slowly count to 10 to make sure the full dose of medicine is given (Figure T).
|  |
D. Remove the pen from the injection site.
- Lift the pen straight up from the injection site (Figure U).
- If you see 1 or 2 drops of medicine on the needle tip, this is normal and will not affect your dose.
-
If you see more than 2 drops of medicine on the needle tip, or you see liquid around the injection site after your injection, you may not have received your full dose.
If this happens: Do not inject another dose. Contact your healthcare provider for help. Next time you inject, make sure to keep the pen needle in your skin and continue to hold the injection button down while slowly counting to 10 (see Figure T).
Note: As the pen is used, a plunger will appear in the cartridge and move towards the thick line. | 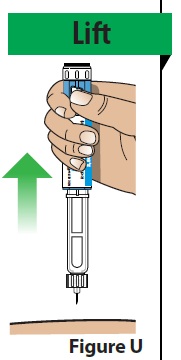
|
6. After the Injection
|
A. Carefully place the outer needle cover back onto the needle.
- Place the outer needle cover on a flat surface. Hold the syringe with the needle attached in 1 hand and carefully slip the needle into the outer needle cover without using the other hand. Push the outer needle cover completely on (Figure V).
Do not recap with the inner needle cover. | 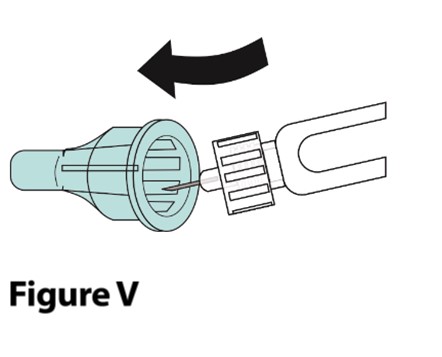 |
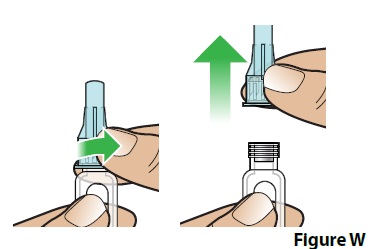
B. Unscrew and remove the covered needle (Figure W).
- Squeeze the lower part of the covered needle while turning it to the left (counter clockwise).
- Keep turning until the covered needle lifts away from the pen. It may take several turns for the covered needle to lift away from the pen.
|  |
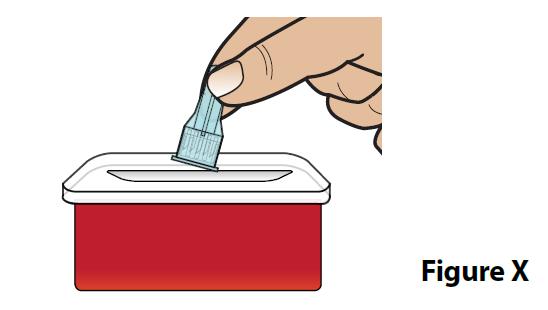
C. Throw away (dispose of) the covered needle in a FDA-cleared sharps container (Figure X).
|  |
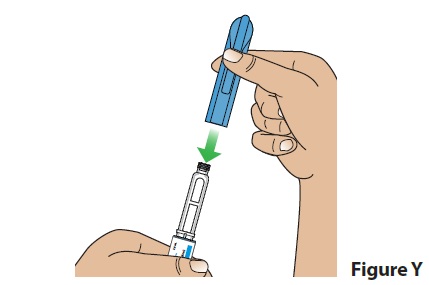
D. Put the pen cap back on the pen (Figure Y) and store the pen.
- After use, store pens with the cap on at room temperature between 68°F to 77°F (20°C to 25°C) or in the refrigerator between 36°F to 46°F (2°C to 8°C) for up to 28 days.
- See the section "How should I store my BYNFEZIA PEN?" for more information on storing your pen.
|  |
E. Treat the injection site.
- If needed, press the injection site lightly with a cotton ball or an alcohol swab. Do not rub the area.
| |
Cleaning the Pen
|
- Wipe the outside of the pen with a clean, damp cloth.
- White particles may appear on the outside tip of the cartridge during normal use. You may remove them with an alcohol swab.
-
Do not put the pen in water or any other liquid.
| |
Additional Disposal Information
|
Put used pens and needles in a FDA-cleared sharps disposal container right away after use. Do not throw away (dispose of) pens and needles in the household trash.
If you do not have a FDA-cleared sharps disposal container, you may use a household container that is:
- made of a heavy-duty plastic,
- can be closed with a tight-fitting, puncture-resistant lid, without sharps being able to come out,
- upright and stable during use,
- leak-resistant, and
- properly labeled to warn of hazardous waste inside the container.
When your sharps disposal container is almost full, you will need to follow your community guidelines for the right way to dispose of your sharps disposal container. There may be state or local laws about how you should throw away used needles and syringes. For more information about safe sharps disposal, and for specific information about sharps disposal in the state that you live in, go to the FDA's website at: http://www.fda.gov/safesharpsdisposal
-
Do not dispose of your used sharps disposal container in your household trash unless your community guidelines permit this.
-
Do not recycle your used sharps disposal container.
-
Always keep the sharps disposal container out of the reach of children and pets.
| |