FULL PRESCRIBING INFORMATION
WARNING: ENDOPHTHALMITIS
The SUSVIMO implant has been associated with a 3-fold higher rate of endophthalmitis than monthly intravitreal injections of ranibizumab. Many of these events were associated with conjunctival retractions or erosions. Appropriate conjunctiva management and early detection with surgical repair of conjunctival retractions or erosions may reduce the risk of endophthalmitis. In clinical trials, 2.0% of patients receiving a ranibizumab implant experienced at least one episode of endophthalmitis [see Contraindications (4.1), Warnings and Precautions (5.1)].
1 INDICATIONS AND USAGE
SUSVIMO (ranibizumab injection) is indicated for the treatment of patients with Neovascular (wet) Age-related Macular Degeneration (AMD) who have previously responded to at least two intravitreal injections of a Vascular Endothelial Growth Factor (VEGF) inhibitor medication.
2 DOSAGE AND ADMINISTRATION
2.1 General Information
For Intravitreal Use via SUSVIMO ocular implant.
The SUSVIMO initial fill and ocular implant insertion and implant removal procedures must be performed under aseptic conditions by a physician experienced in vitreoretinal surgery. The SUSVIMO ocular implant must be surgically implanted in the eye or removed from the eye (if medically necessary) in an operating room using aseptic technique. See SUSVIMO Instructions for Use and the standardized steps to optimize surgical outcomes.
SUSVIMO refill-exchange procedures must be performed under aseptic conditions by a physician experienced in ophthalmic surgery [see Dosage and Administration (2.7)].
Do not administer SUSVIMO (ranibizumab injection) as a bolus intravitreal injection. Do not substitute SUSVIMO (ranibizumab injection) with other ranibizumab products.
2.2 Neovascular (Wet) Age-Related Macular Degeneration (AMD)
The recommended dose of SUSVIMO (ranibizumab injection) is 2 mg (0.02 mL of 100 mg/mL solution) continuously delivered via the SUSVIMO ocular implant with refills administered every 24 weeks (approximately 6 months).
2.3 Supplemental Treatment with Intravitreal Ranibizumab Injection
Supplemental treatment with 0.5 mg (0.05 mL of 10 mg/mL) intravitreal ranibizumab injection may be administered in the affected eye while the SUSVIMO implant is in place and if clinically necessary [see Clinical Studies (14)].
2.4 Ocular Implant Initial Fill
The implant initial fill procedure must be performed by a physician experienced in vitreoretinal surgery [see Dosage and Administration (2.1)]. The implant will be filled using aseptic technique with 0.02 mL of SUSVIMO (ranibizumab injection) prior to insertion of the implant into the patient's eye [see Dosage and Administration (2.5)]. Refer to the complete SUSVIMO Instructions for Use for the initial fill and implant procedure included in the insertion tool assembly carton for further details.
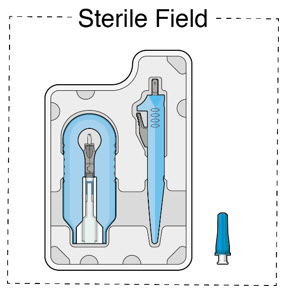
Use aseptic technique to carry out the following preparation steps prior to insertion of the ocular implant into the patient's eye:
Step 1: Gather the supplies needed.
| ||
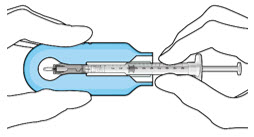
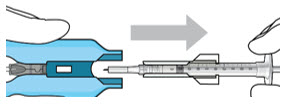
| Step 2: Transfer Dose from Vial to Syringe | ||
| Note: | Use the filter needle (not included) to withdraw SUSVIMO (ranibizumab injection) from the vial. | 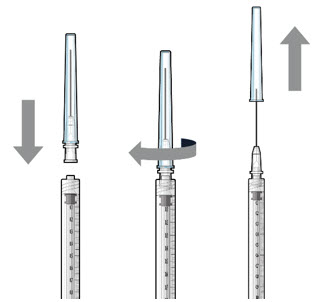 Figure 1 |
Do not use the SUSVIMO initial fill needle for this step.
|
||
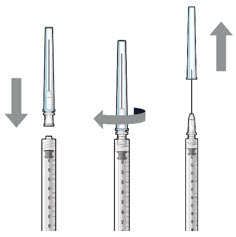
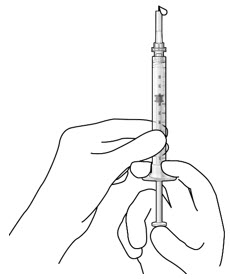
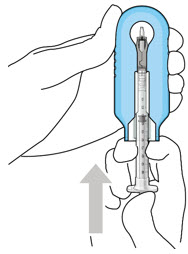
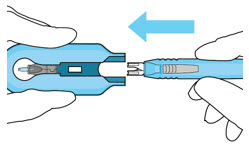
Step 3: Remove Air from Syringe
| 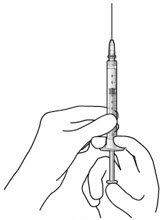 Figure2 |
|
| Step 4: Attach SUSVIMO Initial Fill Needle
Do not use the filter needle to fill the implant.
|  Figure 3 |
|
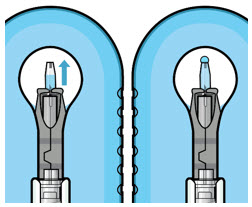
Step 5: Remove Any Remaining Air from Syringe
|  Figure 4 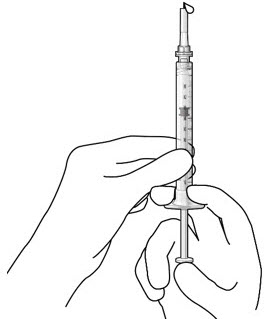 Figure 5 |
|
| Note: | It is important to preserve as much drug as possible in order to completely fill the implant. | |
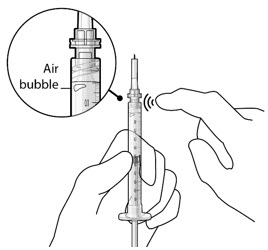
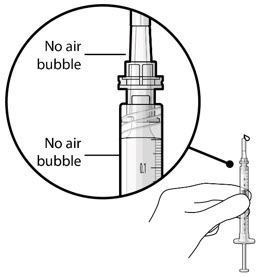
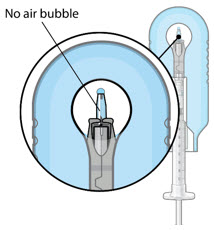
Step 6: Inspect the Syringe for Air Bubbles
| 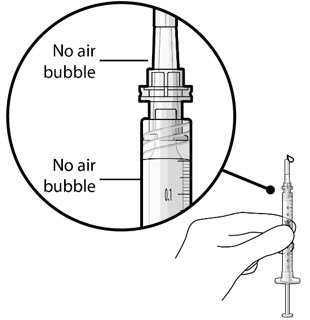 Figure 6 |
|
| Note: | Use the syringe within 15 minutes of removing all air to avoid ranibizumab drying in the needle and impeding fluid flow. Do not use the initial fill needle if the needle is clogged. |
|
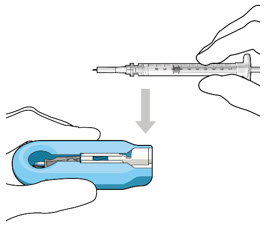
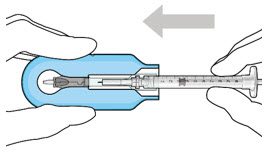
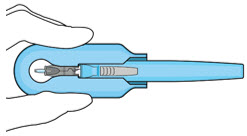
| Step 7: Load Syringe into the Carrier
Do not hold or push on the plunger rod of the syringe while inserting the needle into the implant septum.
| 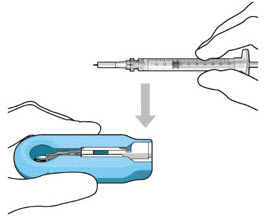 Figure 7: Align and lower the syringe into the carrier 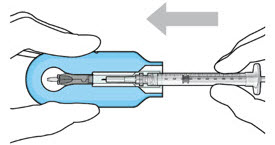 Figure 8: Push the syringe into the carrier 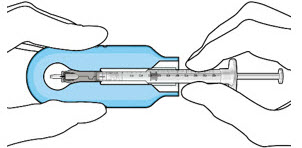 Figure 9: Syringe with initial fill needle inserted through the implant septum |
|
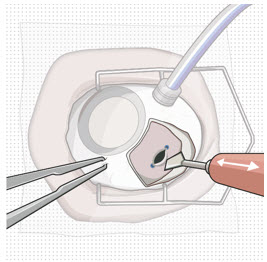
Step 8: Fill Ocular Implant with SUSVIMO (ranibizumab injection) Under Microscope
| 
Figure 10: Administer ranibizumab into the implant 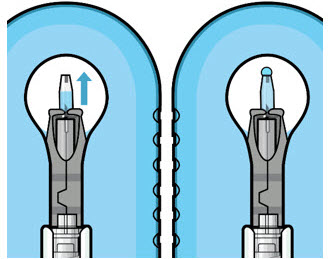
Figure 11: Dome of drug solution forms at tip of implant as viewed under magnification |
|
| Note: | When filling the ocular implant, drug solution should only exit the ocular implant from the release control element. If drug solution is leaking from the implant at a different location, such as the side of the implant, do not use the ocular implant. If fluid is leaking from the septum at the needle insertion site, the needle may not be fully penetrating the implant septum. Fully push the syringe forward before continuing to fill the ocular implant. |
|
|
||
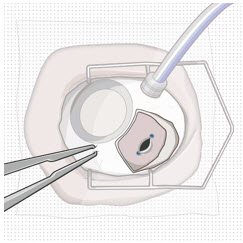
Step 9: Inspect the Filled Ocular Implant Under the Microscope
| 
Figure 12: Proper appearance of implant after initial filling with ranibizumab |
|
| Note: | Minimize air bubbles within the implant reservoir as they may cause slower drug release. If an air bubble is present, it must be no larger than 1/3 of the widest diameter of the implant. If excess air is observed, do not use the ocular implant. | |
| Note: | No more than 30 minutes should pass between the initial fill of the implant and the insertion into the patient's eye to ensure that the release control element remains saturated with SUSVIMO (ranibizumab injection). If SUSVIMO (ranibizumab injection) dries in the release control element, the implant may not release the drug properly into the vitreous after insertion. | |
Step 10: Remove the Syringe and Guide Sleeve from the Carrier
| 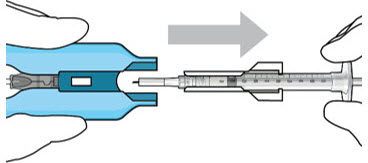 Figure 13: Remove the syringe and guide sleeve from the insertion tool carrier |
|
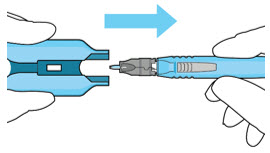
| Step 11: Slide the Insertion Tool Handle into the Carrier | 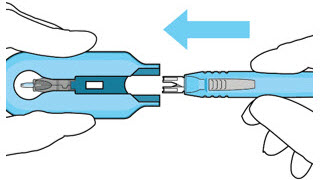 Figure 14: Insert the handle into the insertion tool carrier 
Figure 15: Fully inserted handle |
|
| Note: | Do not withdraw the handle and implant until the eye is ready for insertion. Contact between the implant and any surface or object – even within the sterile field – may result in the introduction of a foreign body into the vitreous. | |
2.5 Ocular Implant Insertion
SUSVIMO ocular implant insertion is a surgical procedure that is performed in an operating room. The procedure must be performed under aseptic conditions by a physician experienced in vitreoretinal surgery [see Dosage and Administration (2.1)].
The ocular implant is filled with SUSVIMO (ranibizumab injection) immediately prior to insertion. No more than 30 minutes should pass between the initial fill of the ocular implant and the insertion into the patient's eye.
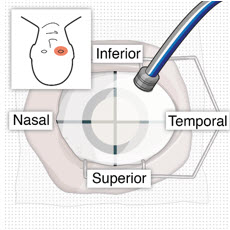
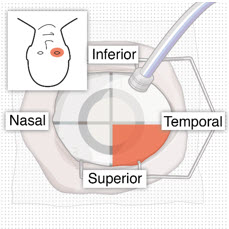
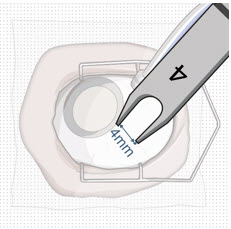
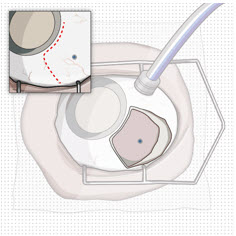
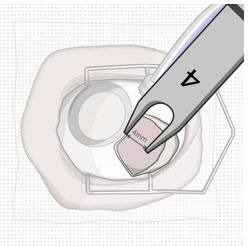
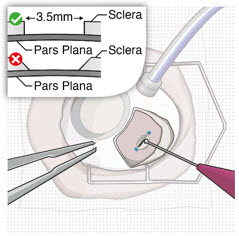
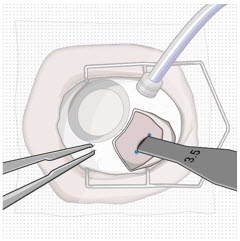
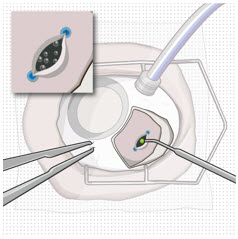
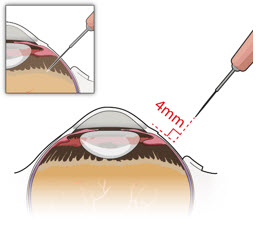
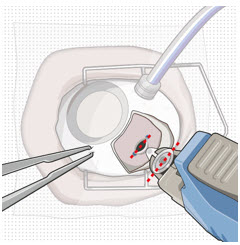
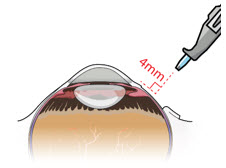
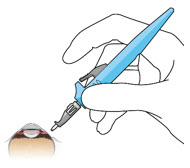
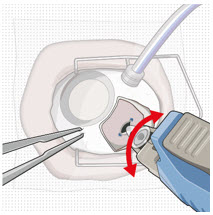
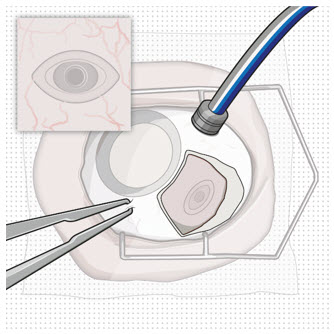
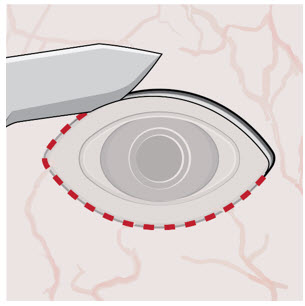
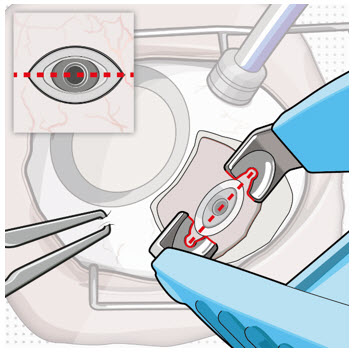
After placing an infusion line in the eye, create at least a 6×6 mm peritomy of the conjunctiva and Tenon's capsule centered around the selected SUSVIMO implant location in the supero-temporal quadrant. Perform careful conjunctival incision, hemostasis of the underlying sclera, and generous undermining of Tenon's capsule. Using aseptic technique, fill the ocular implant [see Dosage and Administration (2.4)]. Using an MVR blade, create a full thickness dissection of the sclera 4 mm from the limbus until the pars plana is fully visible, with final target scleral incision length of 3.5 mm. Using a 532 nm laser endoprobe, apply contiguous, overlapping laser spots starting at 300 mW 1000 ms along the full length of the exposed pars plana and repeat until complete ablation is achieved. Pass a 3.2 mm slit knife perpendicularly through the center of the scleral dissection to open the underlying pars plana. Use the insertion tool to slowly insert the SUSVIMO implant into the sclero-pars plana incision perpendicular to the globe, ensuring that the long axis of the implant flange is properly aligned with the sclero-pars plana incision. Using the closed gripper tips of the insertion tool, seat the implant flush against the sclera. Clean any residual vitreous around the implant flange using a vitrector. Suture both Tenon's capsule and conjunctiva, using scleral anchoring at the apex of the peritomy, ensuring complete coverage of the implant flange. Refer to the complete SUSVIMO Instructions for Use for the initial fill and implant procedure included in the insertion tool assembly carton for further details.
2.6 Ocular Implant Removal
Removal of the SUSVIMO ocular implant is a surgical procedure that is performed in an operating room. The procedure must be performed under aseptic conditions by a physician experienced in vitreoretinal surgery [see Dosage and Administration (2.1)].
After placing an infusion line in the eye, create at least a 6×6 mm peritomy of the conjunctiva and Tenon's capsule around the SUSVIMO ocular implant flange. Remove any fibrous capsule or scar tissue that may have formed over the implant flange and septum using scalpel and forceps. With the explant tool oriented perpendicular to the globe, align the contoured tips with the long axis of the implant flange and grasp underneath the implant flange. Once the implant is secured in the explant tool, pull the implant from the eye in a perpendicular motion. Clear any vitreous prolapse present within or around the scleral wound using a vitrector. Completely close the scleral incision with multiple non-absorbable sutures. Close the Tenon's capsule and conjunctiva to completely cover the scleral incision. Refer to the complete Instructions for Use for the implant removal procedure included in the explant tool carton for further details.
2.7 Ocular Implant Refill-Exchange Procedure
The SUSVIMO ocular implant refill-exchange procedure must be performed under strict aseptic conditions by a physician experienced in ophthalmic surgery [see Dosage and Administration (2.1)]. This includes the use of a surgical mask, sterile gloves, and a lid speculum.
Prior to and after the refill-exchange procedure, perform a dilated slit lamp exam and/or dilated indirect ophthalmoscopy to inspect the implant in the vitreous cavity through the pupil to identify if dislodgement of the implant septum has occurred [see Figure 31 and Warnings and Precautions (5.4)]. If the septum has dislodged, any further refill-exchange procedures should not be performed because normal device functioning cannot be assured. Discontinue treatment with SUSVIMO (ranibizumab injection) following septum dislodgement and consider implant removal should the benefit of the removal procedure outweigh the risk.
Step 1: Gather the supplies needed.
| ||
Step 2: Inspect Packaging and Components
| 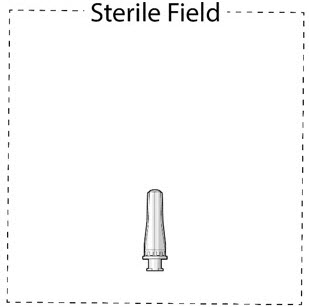 Figure 16 Figure 16 |
|
Step 3: Inspect SUSVIMO (ranibizumab injection)
| ||
Step 4: Patient Preparation
| ||
| Step 5: Transfer Dose from Vial to Syringe | 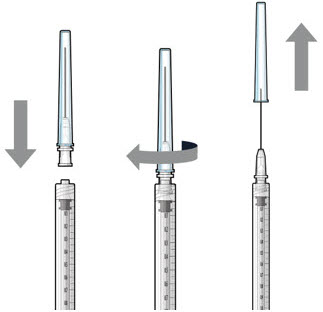 Figure 17 |
|
| Note: | Use the filter needle to withdraw SUSVIMO (ranibizumab injection) from the vial. | |
Do not use the SUSVIMO refill needle for this step.
|
||
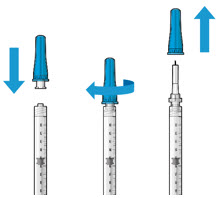
Step 6: Remove Air from Syringe
| 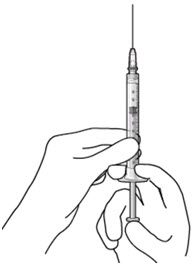 Figure 18 |
|
| Step 7: Attach SUSVIMO Refill Needle
Do not use the filter needle to fill the implant.
| 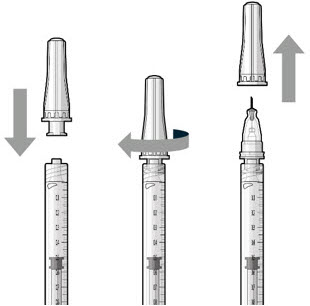 Figure 19 Figure 19 |
|
Step 8: Remove Any Remaining Air from Syringe and Adjust Drug Dose
| 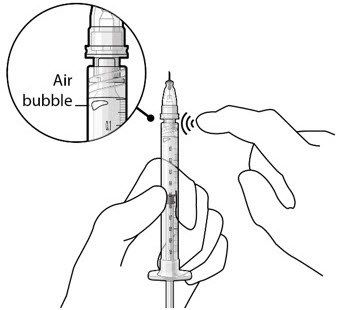
Figure 20 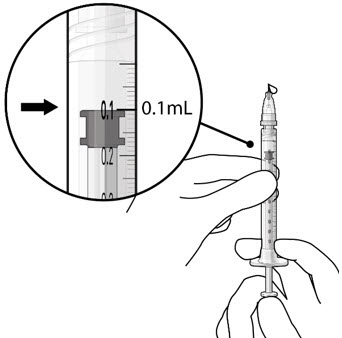
Figure 21 |
|
| Step 9: Inspect the Syringe for Air Bubbles | 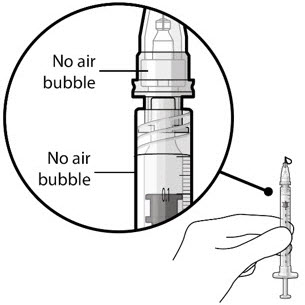
Figure 22 |
|
| Note: | Ensure no air bubbles are present in the syringe and needle hub. Air injected into the implant could result in slower drug release. | |
|
||
| Note: | Use the syringe within 15 minutes of removing all air and adjusting the drug dose to avoid drug solution drying in the needle and impeding fluid flow. Do not use the refill needle or syringe if the needle is clogged. |
|
| Step 10: Stabilize the globe and orient the refill needle | 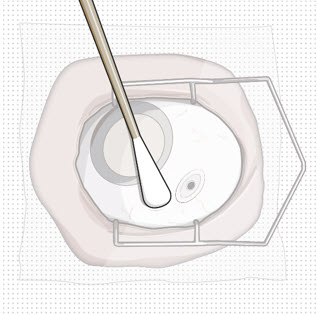
Figure 23 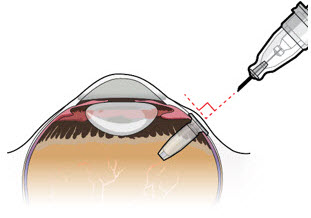 Figure 24 Figure 24 |
|
| Note: | Perform the refill-exchange procedure using magnification (e.g., loupes, reading glasses, magnifiers) for visual assistance. | |
|
||
| Step 11: Insert the Refill Needle | 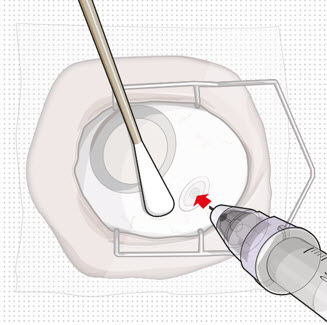
Figure 25 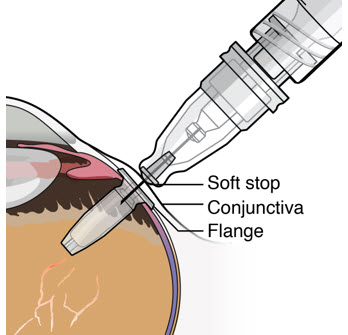 Figure 26 Figure 26 |
|
| Note: | Insert needle at the very center of the implant septum and perpendicular to the implant to ensure the needle inserts fully. Do not maneuver if there is resistance as it will bend the needle. Do not use a bent refill needle; replace if bent or if damage is suspected. |
|
|
||
Step 12: Refill the SUSVIMO Implant
| 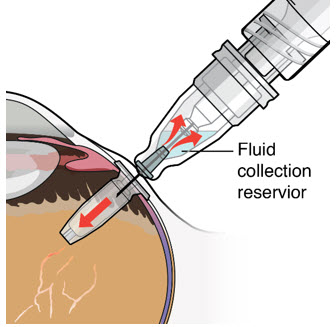 Figure 27 |
|
Step 13: Withdraw the Syringe
| 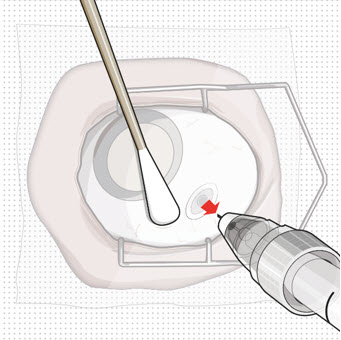
Figure 28 |
|
Step 14: Dispose of the Used Components
| ||
Step 15: Perform Indirect Ophthalmoscopy
| ||
2.8 Delayed or Missed Doses
If a planned dose (refill-exchange) of SUSVIMO (ranibizumab injection) is missed, it should be administered as soon as possible and the subsequent refill-exchange procedures should be performed 24 weeks (approximately 6 months) thereafter.
2.9 Dosage (Refill-Exchange) Modifications for Adverse Reactions
Table 1 describes dosage modifications for specific adverse Reactions [see Warnings and Precautions (5)]. No dosage reductions for SUSVIMO are recommended.
| Adverse Reactions | Dosage Modification |
|---|---|
| Intraocular inflammation ≥ 1 + cells or flare | Withhold dose (refill-exchange) |
| Sight threatening events (e.g., rhegmatogenous retinal detachment, vitreous hemorrhage, unexplained vision loss, etc.) | Withhold dose (refill-exchange) |
| Local infections of either eye | Withhold dose (refill-exchange) |
| Infectious endophthalmitis | Withhold dose (refill-exchange) |
| Severe systemic infection | Withhold dose (refill-exchange) |
| Observed damage to the implant | Withhold dose (refill-exchange) and consider SUSVIMO implant removal [see Dosage and Administration (2.6, 2.7)]. |
3 DOSAGE FORMS AND STRENGTHS
Injection: 100 mg/mL, clear to slightly opalescent, colorless to pale brown solution in a single-dose vial
4 CONTRAINDICATIONS
4.1 Ocular or Periocular Infections
SUSVIMO (ranibizumab injection) is contraindicated in patients with ocular or periocular infections.
5 WARNINGS AND PRECAUTIONS
The SUSVIMO implant and/or implant-related procedures have been associated with endophthalmitis, rhegmatogenous retinal detachment, implant dislocation, septum dislodgement, vitreous hemorrhage, conjunctival erosion, conjunctival retraction, and conjunctival blebs. Patients should be instructed to report any signs or symptoms that could be associated with these events without delay. In some cases, these events can present asymptomatically. The implant and the tissue overlying the implant flange should be monitored routinely following the implant insertion, and refill-exchange procedures to permit early medical or surgical intervention as necessary. Special precautions need to be taken when handling SUSVIMO components [see How Supplied/Storage and Handling (16.3)].
5.1 Endophthalmitis
In the active comparator period of controlled clinical trials, the ranibizumab implant has been associated with a 3-fold higher rate of endophthalmitis than monthly intravitreal injections of ranibizumab (1.7% in the SUSVIMO arm vs 0.5% in the intravitreal arm). When including extension phases of clinical trials, 2.0% (11/555) of patients receiving the ranibizumab implant experienced an episode of endophthalmitis. Reports occurred between days 5 and 853, with a median of 173 days. Many, but not all, of the cases of endophthalmitis reported a preceding or concurrent conjunctival retraction or erosion event.
Endophthalmitis should be treated promptly in an effort to reduce the risk of vision loss and maximize recovery. The SUSVIMO (ranibizumab injection) dose (refill-exchange) should be delayed until resolution of endophthalmitis [see Dosage and Administration (2.9) and Adverse Reactions (6.1)].
Patients should not have an active or suspected ocular or periocular infection or severe systemic infection at the time of any SUSVIMO implant or refill procedure. Appropriate intraoperative handling followed by secure closure of the conjunctiva and Tenon's capsule, and early detection and surgical repair of conjunctival erosions or retractions may reduce the risk of endophthalmitis [see Warnings and Precautions (5.5)].
5.2 Rhegmatogenous Retinal Detachment
Rhegmatogenous retinal detachments have occurred in clinical trials of SUSVIMO and may result in vision loss. Rhegmatogenous retinal detachments should be promptly treated with an intervention (e.g., pneumatic retinopexy, vitrectomy, or laser photocoagulation). SUSVIMO (ranibizumab injection) dose (refill-exchange) should be delayed in the presence of a retinal detachment or retinal break [see Dosage and Administration (2.9)].
Careful evaluation of the retinal periphery is recommended to be performed, and any suspected areas of abnormal vitreo-retinal adhesion or retinal breaks should be treated before inserting the implant in the eye.
5.3 Implant Dislocation
In clinical trials, the device has dislocated/subluxated into the vitreous cavity or has extended outside the vitreous cavity into or beyond the subconjunctival space. Device dislocation requires urgent surgical intervention. Strict adherence to the scleral incision length and appropriate targeting of the pars plana during laser ablation may reduce the risk of implant dislocation.
5.4 Septum Dislodgement
In clinical trials, a type of implant damage where the septum has dislodged into the implant body has been reported. Perform a dilated slit lamp exam and/or dilated indirect ophthalmoscopy to inspect the implant in the vitreous cavity through the pupil prior to and after the refill-exchange procedure to identify if septum dislodgement has occurred. Discontinue treatment with SUSVIMO (ranibizumab injection) following septum dislodgement and consider implant removal should the benefit of the removal procedure outweigh the risk [see Dosage and Administration (2.8)].
Appropriate handling and insertion of the refill needle into the septum (avoid twisting and/or rotation) is required to minimize the risk of septum dislodgement [see Dosage and Administration (2.7)].
5.5 Vitreous Hemorrhage
Vitreous hemorrhages may result in temporary vision loss. Vitrectomy may be needed in the case of a non-clearing vitreous hemorrhage [see Dosage and Administration (2.9)].
In clinical trials of SUSVIMO including extension phases, vitreous hemorrhages were reported in 5.2% (23/443) of patients receiving SUSVIMO. The majority of these hemorrhages occurred within the first post-operative month following surgical implantation and the majority of vitreous hemorrhages resolved spontaneously. Patients on antithrombotic medication (e.g., oral anticoagulants, aspirin, nonsteroidal anti-inflammatory drugs) may be at increased risk of vitreous hemorrhage. Antithrombotic medications are recommended to be temporarily interrupted prior to the implant insertion procedure. The SUSVIMO (ranibizumab injection) dose (refill-exchange) should be delayed in the event of sight-threatening vitreous hemorrhage. The use of pars plana laser ablation and scleral cauterization should be performed to reduce the risk of vitreous hemorrhage.
5.6 Conjunctival Erosion or Retraction
A conjunctival erosion is a full thickness degradation or breakdown of the conjunctiva in the area of the implant flange. A conjunctival retraction is a recession or opening of the limbal and/or radial peritomy. Conjunctival erosions or retractions have been associated with an increased risk of endophthalmitis, especially if the implant becomes exposed. Surgical intervention (e.g., conjunctival/Tenon's capsule repair) is recommended to be performed in case of conjunctival erosion or retraction with or without exposure of the implant flange.
In clinical trials of SUSVIMO including extension phases, 3.6% (16/443) of patients receiving SUSVIMO reported conjunctival erosion and 1.6% (7/443) of patients receiving SUSVIMO reported conjunctival retraction in the study eye.
Appropriate intraoperative handling of conjunctiva and Tenon's capsule to preserve tissue integrity and secure closure of peritomy while ensuring placement of sutures away from implant edge may reduce the risk of conjunctival erosion or retraction. The implant and the tissue overlying the implant flange should be monitored routinely following the implant insertion.
5.7 Conjunctival Bleb
A conjunctival bleb is an encapsulated elevation of the conjunctiva above the implant flange, which may be secondary to subconjunctival thickening or fluid. Conjunctival blebs may require surgical management to avoid further complications, especially if the implant septum is no longer identifiable due to the conjunctival bleb.
In clinical trials of SUSVIMO including extension phases, 5.9% (26/443) of patients receiving SUSVIMO reported conjunctival bleb/conjunctival filtering bleb leak in the study eye. Strict adherence to the scleral incision length, appropriate intraoperative handling of conjunctiva and Tenon's capsule to preserve tissue integrity and secure closure of peritomy, and proper seating of the refill needle during refill-exchange procedures may reduce the risk of conjunctival bleb.
5.8 Postoperative Decrease in Visual Acuity
Visual acuity was decreased by 4 letters on average in the first postoperative month and 2 letters on average in the second postoperative month following initial implantation of SUSVIMO [see Clinical Studies (14)].
5.9 Air Bubbles Causing Improper Filling of the Implant
Minimize air bubbles within the implant reservoir as they may cause slower drug release. During the initial fill procedure, if an air bubble is present, it must be no larger than 1/3 of the widest diameter of the implant. If excess air is observed after initial fill, do not use the implant. During the refill-exchange procedure, if excess air is present in the syringe and needle do not use the syringe and needle. If excess air bubbles are observed after the refill-exchange procedure, consider repeating the refill-exchange procedure.
6 ADVERSE REACTIONS
The following adverse reactions are discussed in greater detail in other sections of the label:
- Endophthalmitis [see Warnings and Precautions (5.1)]
- Rhegmatogenous Retinal Detachment [see Warnings and Precautions (5.2)]
- Implant Dislocation [see Warnings and Precautions (5.3)]
- Vitreous Hemorrhage [see Warnings and Precautions (5.5)]
- Conjunctival Erosion or Retraction [see Warnings and Precautions (5.6)]
- Conjunctival Bleb [see Warnings and Precautions (5.7)]
- Postoperative Decrease in Visual Acuity [see Warnings and Precautions (5.8)]
6.1 Clinical Trials Experience
Because clinical trials are conducted under widely varying conditions, adverse reaction rates observed in one clinical trial of a drug cannot be directly compared with rates in the clinical trials of the same or another drug and may not reflect the rates observed in practice.
The data below (Table 2) reflect exposure of 248 patients with nAMD in the Archway study following the SUSVIMO initial fill and implant insertion, refill, and implant removal (if necessary) procedures up to Week 40. In this patient population the most common (≥ 10%) adverse reactions up to Week 40 were conjunctival hemorrhage (72%), conjunctival hyperemia (26%), iritis (23%), and eye pain (10%).
| Adverse Reactions | Week 40 | |
|---|---|---|
| SUSVIMO n = 248 | Intravitreal ranibizumab n = 167 |
|
|
||
| Conjunctival hemorrhage | 72% | 6% |
| Conjunctival hyperemia | 26% | 2% |
| Iritis* | 23% | 0.6% |
| Eye pain | 10% | 5% |
| Vitreous floaters | 9% | 2% |
| Conjunctival bleb/ filtering bleb leak† | 9% | 0 |
| Foreign body sensation in eyes | 7% | 1% |
| Headache‡ | 7% | 2% |
| Hypotony of eye | 6% | 0 |
| Vitreous detachment | 6% | 5% |
| Vitreous hemorrhage | 5% | 2% |
| Conjunctival edema | 5% | 0 |
| Corneal disorder | 4% | 0 |
| Corneal abrasion§ | 4% | 0.6% |
| Corneal edema | 4% | 0 |
6.2 Immunogenicity
As with all therapeutic proteins, there is potential for immune response in patients treated with ranibizumab including SUSVIMO. The detection of an immune response is highly dependent on the sensitivity, specificity, and drug tolerance level of the assay. Additionally, the observed incidence of antibody positivity in an assay may be influenced by several factors including assay methodology, sample handling, timing of sample collection, concomitant medications, and underlying disease. For these reasons, comparison of the incidence of antibodies in the study described below with the incidence of antibodies in other studies or to other products may be misleading.
In previously treated nAMD patients, anti-ranibizumab antibodies were detected in 2.1% (5 of 243) of patients prior to insertion of the SUSVIMO implant. After the SUSVIMO implant insertion and treatment, anti-ranibizumab antibodies developed in 12% (29 of 247) patients. No clinically meaningful differences in the pharmacokinetics, efficacy, or safety in patients with treatment-emergent anti-ranibizumab antibodies were observed.
8 USE IN SPECIFIC POPULATIONS
8.1 Pregnancy
Risk Summary
There are no adequate and well-controlled studies of SUSVIMO (ranibizumab injection) administration in pregnant women. Administration of ranibizumab to pregnant monkeys throughout the period of organogenesis resulted in a low incidence of skeletal abnormalities at intravitreal doses up to 41 times the human exposure (based on serum levels following the recommended clinical dose). No skeletal abnormalities were observed at serum trough levels similar to the human exposure after a single eye treatment at the recommended clinical dose [see Animal Data].
Animal reproduction studies are not always predictive of human response, and it is not known whether ranibizumab can cause fetal harm when administered to a pregnant woman. Based on the anti-VEGF mechanism of action for ranibizumab [see Clinical Pharmacology (12.1)], treatment with SUSVIMO (ranibizumab injection) may pose a risk to human embryofetal development.
All pregnancies have a background risk of birth defects, loss, and other adverse outcomes. The background risk of major birth defects and miscarriage for the indicated population is unknown. In the U.S. general population, the estimated background risk of major birth defects is 2% – 4% and of miscarriage is 15% – 20% of clinically recognized pregnancies.
Data
Animal Data
An embryo-fetal developmental toxicity study was performed on pregnant cynomolgus monkeys. Pregnant animals received intravitreal injections of ranibizumab every 14 days starting on Day 20 of gestation, until Day 62 at doses of 0, 0.125, and 1 mg/eye. Skeletal abnormalities including incomplete and/or irregular ossification of bones in the skull, vertebral column, and hindlimbs and shortened supernumerary ribs were seen at a low incidence in fetuses from animals treated with 1 mg/eye of ranibizumab. The 1 mg/eye dose resulted in trough serum ranibizumab levels up to 41 times higher than observed human Cmax levels of SUSVIMO (ranibizumab injection) after treatment of a single eye.
No skeletal abnormalities were seen at the lower dose of 0.125 mg/eye, a dose which resulted in trough exposures similar to single eye treatment with SUSVIMO (ranibizumab injection) in humans. No effect on the weight or structure of the placenta, maternal toxicity, or embryotoxicity was observed.
8.2 Lactation
Risk Summary
There are no data available on the presence of ranibizumab in human milk, the effects of ranibizumab on the breastfed infant or the effects of ranibizumab on milk production/excretion. Because many drugs are excreted in human milk, and because the potential for absorption and harm to infant growth and development exists, caution should be exercised when SUSVIMO is administered to a nursing woman.
The developmental and health benefits of breastfeeding should be considered along with the mother's clinical need for SUSVIMO (ranibizumab injection) and any potential adverse effects on the breastfed child from ranibizumab.
8.3 Females and Males of Reproductive Potential
Contraception
Females of reproductive potential should use effective contraception during treatment with SUSVIMO (ranibizumab injection) and for at least 12 months after the last dose of SUSVIMO (ranibizumab injection).
Infertility
No studies on the effects of ranibizumab on fertility have been conducted and it is not known whether ranibizumab can affect reproduction capacity. Based on the anti-VEGF mechanism of action for ranibizumab, treatment with SUSVIMO (ranibizumab injection) may pose a risk to reproductive capacity.
11 DESCRIPTION
Ranibizumab is a recombinant humanized IgG1 kappa isotype monoclonal antibody fragment for intraocular use. Ranibizumab binds to and inhibits the biologic activity of human vascular endothelial growth factor-A (VEGF-A). Ranibizumab, which lacks an Fc region, has a molecular weight of approximately 48 kilodaltons and is produced by an E. coli expression system in a nutrient medium containing the antibiotic tetracycline. Tetracycline is not detectable in the final product.
SUSVIMO (ranibizumab injection) is supplied as a sterile, clear to slightly opalescent, colorless to pale brown solution for intravitreal use via the SUSVIMO implant. Each single-dose vial contains 10 mg of ranibizumab, histidine HCl (0.1 mg), polysorbate 20 (0.01 mg), sucrose (8.2 mg), and Water for Injection, in 0.1 mL of solution with a pH of 5.5. The SUSVIMO implant is designed to contain approximately 0.02 mL (2 mg) of ranibizumab solution when filled. SUSVIMO does not contain an antimicrobial preservative.
12 CLINICAL PHARMACOLOGY
12.1 Mechanism of Action
Ranibizumab binds to the receptor binding site of multiple biologically active forms of VEGF-A, including VEGF110. VEGF-A has been shown to cause neovascularization and leakage in models of ocular angiogenesis and vascular occlusion and is thought to contribute to pathophysiology of neovascular AMD. The binding of ranibizumab to VEGF-A prevents the interaction of VEGF-A with its receptors (VEGFR1 and VEGFR2) on the surface of endothelial cells, reducing endothelial cell proliferation, vascular leakage, and new blood vessel formation.
12.3 Pharmacokinetics
The SUSVIMO implant provides a continuous release of ranibizumab where the release of ranibizumab into the vitreous decreases over time as the concentration in the implant decreases with a half-life of approximately 25 weeks. The ranibizumab serum concentrations with a SUSVIMO 24-week treatment interval are maintained below the maximum and above the minimum concentrations experienced with monthly 0.5 mg intravitreal ranibizumab.
Distribution
Following implant insertion of SUSVIMO, the mean (±SD) maximum ranibizumab serum concentration (Cmax) was 0.48 (±0.17) ng/mL and median (range) time to maximum serum concentration (Tmax) was 26 (1 – 89) days. Following the initial fill and refill of SUSVIMO in patients with AMD, maximum serum concentrations of ranibizumab were below the ranibizumab concentration necessary to inhibit the biological activity of VEGF by 50%. Ranibizumab did not accumulate in serum when administered with refills every 24 weeks.
Elimination
Specific Populations
In a population pharmacokinetic analysis of AMD patients with SUSVIMO, 75% (220 of 295) had renal impairment (42% mild [CrCL 60 to 89 mL/min], 30% moderate [CrCL 30 to 59 mL/min] and 2% severe [CrCL < 30mL/min]). Systemic clearance of ranibizumab was slightly lower in renally impaired patients, but was not clinically significant. No clinically significant differences in the pharmacokinetics of ranibizumab were observed based on age.
13 NONCLINICAL TOXICOLOGY
13.1 Carcinogenesis, Mutagenesis, Impairment of Fertility
No studies have been conducted to determine the carcinogenic or mutagenic potential of SUSVIMO (ranibizumab injection). Based on the anti-VEGF mechanism of action for ranibizumab, treatment with SUSVIMO (ranibizumab injection) may pose a risk to reproductive capacity [see Females and Males of Reproductive Potential (8.3)].
14 CLINICAL STUDIES
The clinical efficacy and safety of SUSVIMO (ranibizumab injection) was assessed in a randomized, visual assessor-masked, active treatment-controlled study (Archway-NCT03677934) in patients with AMD. A total of 415 patients (248 in the SUSVIMO arm and 167 in the intravitreal ranibizumab arm) were enrolled and treated in this study. Patients were diagnosed with nAMD within the 9 months prior to screening and received ≥ 3 doses of anti-VEGF intravitreal agents in the study eye within the last 6 months prior to screening. Each patient was required to have demonstrated a response to an anti-VEGF intravitreal agent prior to randomization. Patients were randomized in a 3:2 ratio to receive continuous delivery of SUSVIMO (ranibizumab injection) via the SUSVIMO implant every 24 weeks or 0.5 mg intravitreal ranibizumab injections every 4 weeks. For patients randomized to the SUSVIMO arm, supplemental treatment with 0.5 mg intravitreal ranibizumab injections was available at Weeks 16, 20, 40, 44, 64, 68, 88, and 92, if needed. In the first 24 weeks, 1.6% of patients assessed for supplemental treatment received 1 or more supplemental treatment(s) and in the following 24 weeks, 5.4% of patients assessed for supplemental treatment received 1 or more supplemental treatment(s).
The primary efficacy endpoint of change from baseline in distance Best Corrected Visual Acuity (BCVA) score averaged over Week 36 and Week 40 demonstrated that SUSVIMO was equivalent to intravitreal ranibizumab injections administered every 4 weeks. Detailed efficacy results are shown in Table 3 and Figure 29 below.
| Outcome Measure* | SUSVIMO (100 mg/mL) n=248 | Intravitreal ranibizumab 0.5 mg (10 mg/mL) n=167 | Difference (95% CI)† |
|---|---|---|---|
| BCVA = Best corrected visual acuity | |||
|
|||
| Adjusted Mean change from baseline in BCVA score averaged over Weeks 36 and 40 | 0.2 | 0.5 | -0.3 (-1.7, 1.1)‡ |
| Q24W = every 24 weeks; Q4W = every 4 weeks |
| Figure 29 Adjusted Mean change from Baseline in Best Corrected Visual Acuity in study eye through Week 48 in the Archway (GR40548) study*, † |
|
|
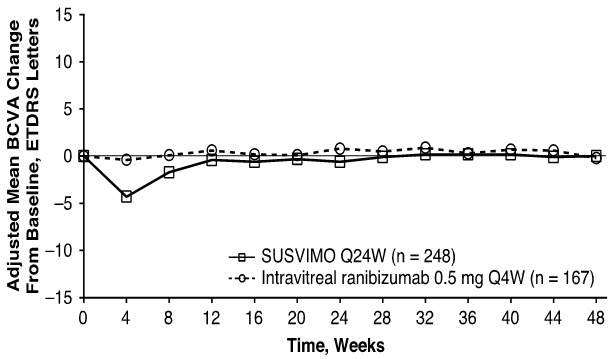
Consistent results were observed across patient subgroup analyses for mean change from baseline in BCVA score (age, gender, number of prior anti-VEGF intravitreal injections, and baseline BCVA score).
16 HOW SUPPLIED/STORAGE AND HANDLING
16.1 How Supplied
Each SUSVIMO initial fill needle kit (NDC 50242-078-55) contains:
- One SUSVIMO 100 mg/mL single-dose glass vial
- One SUSVIMO initial fill needle (34-gauge needle with a 5 μm integrated filter) with a blue cap
Each SUSVIMO (ranibizumab injection) carton (NDC 50242-078-12) contains one SUSVIMO (ranibizumab injection) 100 mg/mL that is clear to slightly opalescent, colorless to pale brown solution in a single-dose glass vial.
Each SUSVIMO refill needle carton contains a SUSVIMO refill needle (34-gauge vented needle with a 5 μm integrated filter) with a clear cap.
| Device and Materials Description | |
| Components | |
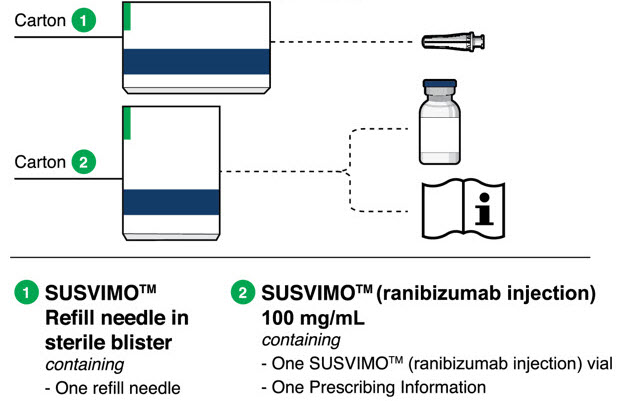
Figure 30 |
|
SUSVIMO implant
| 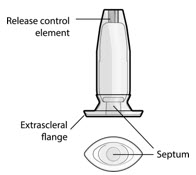
Figure 31 |
SUSVIMO (ranibizumab injection) 100 mg/mL vial
| 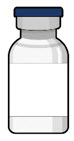
Figure 32 |
SUSVIMO refill needle
| 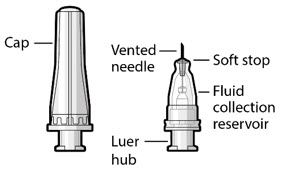
Figure 33 |
Materials List
Materials that are required and supplied to perform the procedure are:
- SUSVIMO refill needle, 34 G, with clear cap
- SUSVIMO (ranibizumab injection) 100 mg/mL
Additional materials required to perform the procedure but are not provided are:
- One sterile 1 mL Luer Lock syringe (not included)
- One sterile 5-micron filter needle (19-gauge × 1½ inch) (not included)
- Anesthetic ophthalmic solutions
- Ophthalmic broad-spectrum microbicide solution
- Cotton tips and gauze
- Sterile powder free gloves
- Face masks
- Lid speculum
- Magnification such as visor or loupes
- Task lighting
- Indirect ophthalmoscope and lens
- Sterile drape (optional for refill-exchange procedure)
16.2 Storage
Store SUSVIMO initial fill needle kit at 2°C to 8°C (36°F to 46°F). Do not freeze. Protect from light. Do not shake. The SUSVIMO initial fill needle has been sterilized with electron beam processing.
Store SUSVIMO (ranibizumab injection) 100 mg/ mL vial at 2°C to 8°C (36°F to 46°F). Do not freeze. Protect from light. Do not shake. Prior to use, the unopened vial may be kept at 9°C to 30°C (48°F to 86°F) for up to 24 hours provided it is protected from light.
Store the SUSVIMO implant and insertion tool assembly, refill needle and explant tool at room temperature 15°C to 25°C (59°F to 77°F). The SUSVIMO implant and insertion tool assembly has been sterilized with ethylene oxide gas. The SUSVIMO refill needle and explant tool have been sterilized with electron beam processing.
16.3 Handling
SUSVIMO components are supplied sterile and are for single-use only. Do not reprocess, re-sterilize, or reuse SUSVIMO components. Do not use if the sterility has been compromised or the contents have been dropped, damaged or tampered with. Do not use past the expiration date printed on the label. Do not open sealed tray until time of use. Avoid contact between sharp surgical instruments and the SUSVIMO implant as the material of the septum and silicone encasing is soft and susceptible to damage.
Important Device Handling Information
- Use caution when performing ophthalmic procedures that may cause deflection of the implant and subsequent injury. For example, B-scan ophthalmic ultrasound, scleral depression, or gonioscopy.
Ocular Implant Initial Fill Procedure
- Minimize air bubbles within the implant reservoir as they may cause slower drug release. If an air bubble is present, it must be no larger than 1/3 of the widest diameter of the implant. If excess air is observed after initial fill, do not use the implant.
Ocular Implant Insertion Procedure
- Perpendicular entry of the implant is important to avoid contact between the implant and intraocular structures such as the lens, as contact between the implant and the intraocular structures may cause adverse reactions such as traumatic cataract.
- Avoid excessive force on the globe by first ensuring that the tip of the implant has passed through the sclero-pars plana incision before slowly pushing the implant into place.
17 PATIENT COUNSELING INFORMATION
Advise the patient to read the FDA-approved patient labeling (Medication Guide).
Advise patients on the following after the implant insertion procedure:
Positioning:
- Keep head above shoulder level for the rest of the day.
- Sleep with head on 3 or more pillows during the day and the night after surgery.
How to care for the treated eye after the procedure:
- Do not remove the eye shield until they are instructed to do so by their healthcare provider. At bedtime, continue to wear the eye shield for at least 7 nights following the implant surgery.
- Administer all post-operative eye medications as directed by their healthcare provider.
- Do not push on the eye, rub the eye, or touch the area of the eye where the implant is located (underneath the eyelid in the upper and outer part of the eye) for 30 days following the implant insertion.
- Do not participate in strenuous activities until 1-month after the implant insertion or after discussion with their healthcare provider.
Advise patients on the following after the Refill-Exchange procedure:
- Refrain from pushing on the treated eye, rubbing the eye, or touching the eye in the area of the implant (located underneath the eyelid in the upper and outer part of your eye) for 7 days following the refill-exchange procedure.
- Administer eye drops as directed by their healthcare provider.
Advise patients on the following after the implant removal procedure (if it is deemed medically necessary):
- Keep your head above shoulder level for the rest of the day.
- Sleep with your head on 3 or more pillows if lying down during the day and night after the implant removal.
- Wear an eye shield for at least 7 nights following the implant removal.
- Do not participate in strenuous activities until 14 days following the implant removal.
- Administer all post-operative anti-inflammatory and antimicrobial drops, as directed by your healthcare provider.
Advise patients on the following throughout SUSVIMO treatment:
- Do not drive or use machinery until the eye shield can be removed and visual function has recovered sufficiently [see Adverse Reactions (6.1)].
- The SUSVIMO implant and/or implant related procedures have been associated with conjunctival reactions (bleb, erosion, retraction), vitreous hemorrhage, endophthalmitis, rhegmatogenous retinal detachment, the dislocation of the implant, septum dislodgement, and a temporary decrease in vision.
- While the implant is in the eye, avoid rubbing the eye or touching the area as much as possible. However, if necessary to do so, make sure hands are cleaned prior to touching the eye.
- Seek immediate care from an ophthalmologist if there are sudden changes in their vision (an increase in moving spots, the appearance of "spider webs", flashing lights, or a loss in vision), increasing eye pain, progressive vision loss, sensitivity to light, redness in the white of the eye, a sudden sensation that something is in their eye, or eye discharge or watering [see Warnings and Precautions (5)].
SUSVIMO™ [ranibizumab injection]
Manufactured by:
Genentech, Inc.
A Member of the Roche Group
1 DNA Way
South San Francisco, CA 94080-4990
U.S. License No.: 1048
SUSVIMO is a trademark of Genentech, Inc.
©2021 Genentech, Inc.
| This Medication Guide has been approved by the U.S. Food and Drug Administration | Approved: 4/2022 |
| MEDICATION GUIDE
SUSVIMO™ (suss-VIH-moh) (ranibizumab injection) for intravitreal use via SUSVIMO ocular implant |
|
| What is the most important information I should know about SUSVIMO? SUSVIMO (ranibizumab injection) is delivered into the eye using the SUSVIMO implant. The SUSVIMO implant and the procedures to insert, fill, refill and remove the eye (ocular) implant can cause serious side effects including:
To help prevent or keep these side effects from becoming more serious follow all post-procedure instructions your healthcare provider gives you. See "How will I receive SUSVIMO?". |
|
| What is SUSVIMO?
SUSVIMO (ranibizumab injection) is a prescription medicine used to treat adults with Neovascular (wet) Age-related Macular Degeneration (AMD) who have responded to at least two injections of a Vascular Endothelial Growth Factor (VEGF) inhibitor in the gel-like part of the eye (intravitreal). It is not known if SUSVIMO is safe and effective in children. |
|
Do not receive SUSVIMO if you:
|
|
Before receiving SUSVIMO, tell your healthcare provider about all of your medical conditions, including if you:
|
|
How will I receive SUSVIMO?
After the Implant Insertion:
|
|
What should I avoid while receiving SUSVIMO?
|
|
| What are the possible side effects of SUSVIMO?
See "What is the most important information I should know about SUSVIMO?" on the first page. In addition to those side effects listed on page one, the SUSVIMO implant and the procedures to insert, fill, refill and remove the eye (ocular) implant can cause other serious side effects including:
|
|
|
|
| These are not all the possible side effects of SUSVIMO. Call your doctor for medical advice about side effects. You may report side effects to FDA at 1-800-FDA-1088. You may also report side effects to Genentech at 1-888-835-2555. |
|
| General information about the safe and effective use of SUSVIMO.
Medicines are sometimes prescribed for purposes other than those listed in a Medication Guide. You can ask your pharmacist or healthcare provider for information about SUSVIMO that is written for health professionals. |
|
| What are the ingredients in SUSVIMO (ranibizumab injection)?
Active ingredient: ranibizumab Inactive ingredients: histidine HCl, polysorbate 20, sucrose. Manufactured by: Genentech, Inc., A Member of the Roche Group, 1 DNA Way, South San Francisco, CA 94080-4990 U.S. License No.: 1048 |
|
Susvimo™
(ranibizumab injection)
For Susvimo ocular implant use
Instructions for Use
| Initial Fill and Implant Procedure |
Caution: Federal Law (USA) restricts this device to sale by or on the order of a physician.
Susvimo procedures should be performed by an ophthalmologist experienced in vitreoretinal surgery.
Refer to the Susvimo (ranibizumab injection) 100 mg/mL prescribing information for a complete list of indications, contraindications, warnings, precautions, and adverse events.
Contents
Introduction
| 3 | Device Description |
| 4 | Components |
| 8 | Intended Use/Indications for Use |
| 8 | Contraindications |
| 8 | Warnings |
| 9 | Precautions |
| 10 | How Supplied, Handling, and Storage |
Instructions for Use
| 11 | Introduction and Materials |
| 13 | Preparatory Procedures |
| 14 | Infusion Line Placement Procedure |
| 15 | Conjunctival Dissection Procedure |
| 17 | Syringe Preparation and Initial Implant Fill |
| 25 | Implant Insertion |
| 35 | Disposal and Post-insertion Procedures |
| 36 | Explanation of symbols on product or package labeling |
| 37 | Susvimo™ Implant Card |
Introduction
These instructions include only the procedure for filling and inserting the Susvimo implant. For more information, refer to the Susvimo prescribing information for the refill-exchange procedure and Susvimo Instructions for Use for the implant removal procedure.
Device Description
Susvimo is an intraocular drug delivery system designed to be used specifically with Susvimo (ranibizumab injection) 100 mg/mL. The system consists of an intraocular implant along with ancillary devices used to fill, insert, and explant (if needed) the implant.
The implant is a refillable drug reservoir that is inserted into the eye through the pars plana. The implant is secured within the scleral incision, with the extrascleral flange that remains visible through the conjunctiva following insertion. Once filled with ranibizumab, the implant is designed to provide continuous release of ranibizumab. The implant will be refilled with ranibizumab in an office-based setting via an administration through the conjunctiva and implant septum.
Components
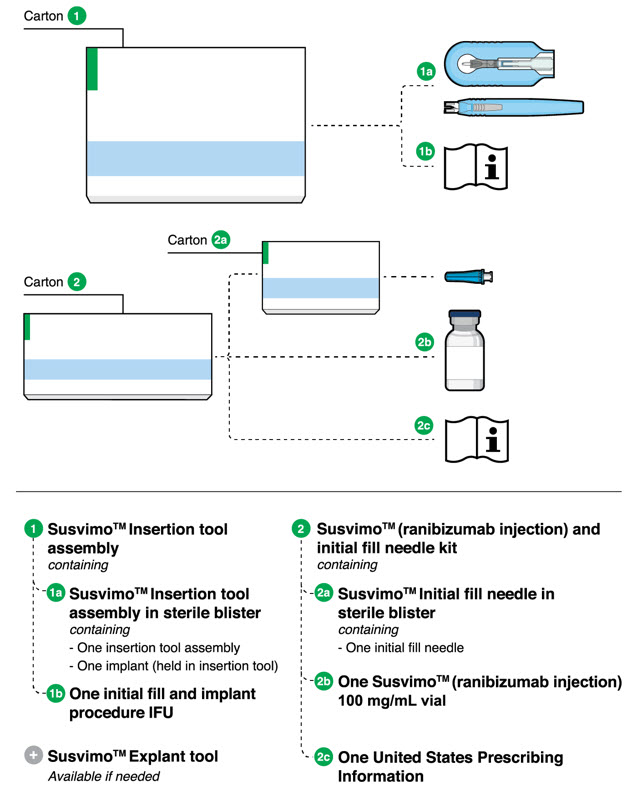
Figure 1
Susvimo components for initial fill and implant procedure
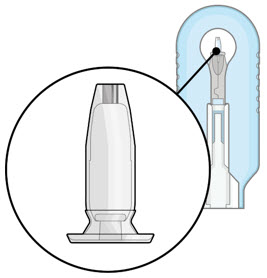
Susvimo implant (packaged with insertion tool assembly)
Susvimo implant (Figure 2 and Figure 3) is a refillable reservoir inserted into the eye through the pars plana. The body of the implant, which includes the release control element, extends into the vitreous cavity.
| Figure 2
Susvimo implant | Figure 3
Susvimo implant detail |
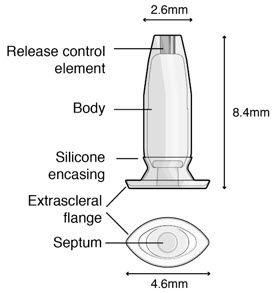
| Implant components | Description |
|---|---|
| Extrascleral flange | The extrascleral flange provides secure anchoring of the implant within the scleral incision and is encased in silicone. |
| Septum | The septum is a self-sealing interface through which ranibizumab is administered into the implant both prior to insertion and during subsequent refills in an office-based setting. |
| Body | The body of the implant contains a hollow drug reservoir, capable of holding 0.02 mL of drug. |
| Release control element | The titanium release control element controls the rate of ranibizumab diffusion from the drug reservoir into the vitreous. |
Susvimo insertion tool assembly
Susvimo insertion tool assembly is designed to facilitate handling of the implant during the initial fill and implant procedure. The insertion tool assembly is comprised of a carrier and handle (Figure 4 and Figure 5), described in more detail below:
| Figure 4
Susvimo insertion tool carrier | Figure 5
Susvimo insertion tool handle |
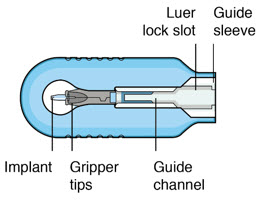
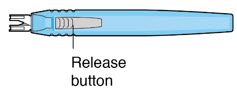
| Insertion tool assembly components | Description |
|---|---|
| Gripper tips | The implant is provided pre-positioned in the insertion tool assembly gripper tips. After initial fill of the implant with ranibizumab, the implant and gripper tips are transferred from the insertion tool carrier to the insertion tool handle. |
| Luer lock slot | The syringe is loaded into the insertion tool carrier by aligning the syringe Luer lock with the insertion tool carrier Luer lock slot. |
| Guide channel | The guide channel serves to direct the syringe and initial fill needle in the insertion tool carrier during the initial fill of the implant. |
| Release button | Pressing the release button on the insertion tool handle will open the gripper tips and release the implant. |
Susvimo (ranibizumab injection) 100 mg/mL vial
Susvimo (ranibizumab injection) (Figure 6) is used to fill the implant prior to insertion or during subsequent refill-exchange in an office-based setting.
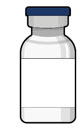
Figure 6
Susvimo (ranibizumab injection) 100 mg/mL vial
Susvimo initial fill needle
Susvimo initial fill needle (Figure 7) is designed to fill the implant with ranibizumab prior to implant insertion. The initial fill needle is distinguished by its blue cap.
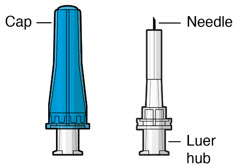
Figure 7
Susvimo initial fill needle
| Initial fill needle components | Description |
|---|---|
| Needle | 34 G needle |
| Integrated filter | Integrated 5 µm filter within needle hub |
Intended Use/Indications for Use
Susvimo ocular implant is approved for use with Susvimo (ranibizumab injection). Refer to the Susvimo (ranibizumab injection) prescribing information for a complete list of indications, contraindications, warnings, precautions, and adverse events.
Contraindications
Susvimo is contraindicated in patients with ocular or periocular infections, with active intraocular inflammation, or with known hypersensitivity to ranibizumab or any of the excipients in Susvimo (ranibizumab injection) 100 mg/mL. Hypersensitivity reactions may manifest as severe intraocular inflammation.
Warnings
- Do not use if the sterility has been compromised or the contents have been dropped, damaged or tampered with.
- Minimize air bubbles within the implant reservoir as they may cause slower drug release. If an air bubble is present, it must be no larger than 1/3 of the widest diameter of the implant.
If excess air is observed after initial fill, do not use the implant. - Perpendicular entry of the implant is important to avoid contact between the implant and intraocular structures such as the lens, as contact between the implant and the intraocular structures may cause adverse events such as traumatic cataract.
- Avoid excessive force on the globe by first ensuring that the tip of the implant has passed through the sclero-pars plana incision before slowly pushing the implant into place.
Precautions
- Read and follow all instructions, warnings, and cautions prior to use.
- Susvimo procedures should be performed by an ophthalmologist experienced in vitreoretinal surgery.
- Use the Susvimo components and materials as specified in these instructions to perform the implant insertion procedure including initial fill.
- Avoid contact between sharp surgical instruments and the implant as the material of the septum and silicone encasing are soft and susceptible to damage.
- The implant is MR Conditional. The Patient Implant card is provided with instructions and must be completed and given to the patient after implant insertion. For further information please refer to the 'Post-insertion patient instructions' section.
Use with Standard Procedures
Susvimo implant is compatible for use with the following standard procedures: A-scan ophthalmic ultrasound, slit lamp examination, indirect ophthalmoscopy, tonometry, optical coherence tomography (OCT), visual field (perimetry), standard lasers for ophthalmic treatments, radiography (x-ray), computed tomography (CT) scan, fluorescein/ indocyanine angiography, and fundus autofluorescence.
Use caution when performing ophthalmic procedures that may cause deflection of the implant and subsequent injury. For example, B-scan ophthalmic ultrasound, scleral depression, or gonioscopy.
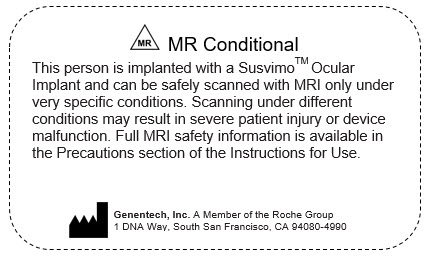
Magnetic Resonance Imaging (MRI) Safety Information
 MR Conditional.
Non-clinical testing has demonstrated that the Susvimo implant is MR Conditional. A patient with this device can be safely scanned in an MR system meeting the following conditions:
- Static magnetic field of 1.5-Tesla (1.5 T) or 3-Tesla (3 T)
- Maximum spatial field gradient of 3,000 G/cm (30 T/m)
- Maximum MR system reported, whole body averaged specific absorption rate (SAR) of 4.0 W/kg (First Level Controlled Operating Mode)
Under the scan conditions defined above, the Susvimo implant is expected to produce a maximum temperature rise of less than 1°C after 15 minutes of continuous scanning.
In non-clinical testing, the image artifact caused by the device extends approximately 4 mm from the Susvimo implant when imaged with a gradient echo pulse sequence in a 3 T MRI system.
How Supplied, Handling, and Storage
- All Susvimo components are supplied sterile.
Do not reprocess or resterilize. - All Susvimo components are for single use only.
Do not reuse Susvimo components. - Do not open sealed tray until time of use.
- Do not use if the package is damaged or broken as sterility may be compromised.
- Do not use past the expiration date printed on the label.
Susvimo ocular implant and insertion tool assembly
- The sealed tray has been sterilized with ethylene oxide gas.
- Store the Susvimo implant and insertion tool assembly at room temperature 15°C to 25°C (59°F to 77°F).
Susvimo (ranibizumab injection) and initial fill needle kit
- Susvimo initial fill kit should be stored at 2°C to 8°C (36°F to 46°F). Do not freeze. Protect from light. Do not shake. Prior to use, the unopened vial may be kept at 9°C to 30°C (48°F to 86°F) for up to 24 hours.
- Susvimo initial fill needle has been sterilized with electron beam processing.
See Susvimo (ranibizumab injection) prescribing information for additional information.
Instructions for Use
Introduction and Materials
Implant insertion is a surgical procedure that is performed in an operating room. The implant is filled with Susvimo (ranibizumab injection) immediately prior to insertion.
Materials List
The materials that are required in the operating room on the day of the procedure are listed in Tables 4 and 5.
| Item Description |
|---|
| Susvimo ocular implant with insertion tool assembly |
| Susvimo initial fill needle, 34 G, with blue cap |
| Susvimo (ranibizumab injection) 100 mg/mL |
| Susvimo explant tool (Refer to Susvimo implant removal Instructions for Use for information on implant removal.) |
| Item Description |
|---|
| One sterile 1 mL Luer Lock syringe (not included) |
| One sterile 5-micron filter needle (19-gauge × 1½ inch) (not included) |
| Surgical microscope |
| Vitrectomy surgical control system |
| Standard 25 G or 27 G vitrectomy set up |
| 23 G or 25 G 532 nm Endolaser probe and associated source |
| Standard vitrectomy tray (including adjustable caliper, 0.12 straight toothed forceps, blunt wescott scissors) |
| Cauterization equipment (including standard fine tip diathermy and eraser tip wet-field cautery) |
| Ophthalmic broad-spectrum microbicide solution |
| Marking pad |
| 3.5 mm and 4.0 mm fixed caliper or equivalent fixed tool |
| 3.5 mm fixed width gauge or equivalent fixed tool |
| 19 G or 20 G MVR Straight Knife |
| Slit Knife, 3.2 mm Straight |
| Gut or Vicryl sutures for conjunctival tissues (suggested 7-0 to 9-0: monofilament recommended) |
| Indirect ophthalmoscope and lens |
| Drapes |
Preparatory Procedures
1. Inspect packaging and components
| |
2. Inspect Susvimo (ranibizumab injection)
|
|
3. Patient Preparation
|
|


Infusion Line Placement Procedure
1. Place infusion line
|
Conjunctival Dissection Procedure
| 1. Identify the site of insertion |
|
| 2. Create conjunctival peritomy | |
|
|
|
|
|
|
|

Syringe Preparation and Initial Implant Fill
Using aseptic technique, the implant will be filled with 0.02 mL of ranibizumab prior to insertion of the implant into the patient's eye.
|
1. Transfer dose from vial to syringe
| |
2. Remove air from syringe
| |
3. Attach initial fill needle
|
|
4. Remove any remaining air from syringe
|
|
5. Inspect the syringe for air bubbles
| |
|
6. Load syringe into the carrier
|
|
7. Fill implant with ranibizumab under microscope
|
|
8. Inspect the filled implant under the microscope
|
|
| 9. Remove the syringe and guide sleeve from the carrier | |
|
|
| 10. Slide the insertion tool handle into the carrier | |
|
|


Implant Insertion
1. Verify hemostasis of the scleral surface
- Clear any excess blood from the scleral surface.
- Perform careful scleral wet field cauterization as needed, particularly in the area of the sclero-pars plana incision.
2. Mark incision site
|
|
3. Perform scleral incision
|
|

| 4. Perform laser treatment of the pars plana
|


- Using a 532 nm laser endoprobe, apply contiguous, overlapping laser spots starting at 300 mW 1000 ms along the full length of the exposed pars plana (Figure 32). Repeat until complete ablation is achieved.
- –
- Maintain focus of laser on exposed pars plana.
- –
- Keep foot pedal depressed to achieve full 1000 ms spots (expect smoke).
- –
- Ensure the pars plana at the corners of scleral incision is adequately treated.
- –
- Do not use painting strokes with the laser.
- –
- Do not contact the pars plana directly with laser probe.
- Repeat application of laser along the full length of the pars plana until full or partial split of the pars plana, or other visual endpoints are achieved, as indicated by:
- –
- Gray color change.
- –
- Uniform perforated appearance.
- –
- Domes of vitreous fluid percolating through pars plana.
- If visual endpoint is not achieved after several passes with the laser, increase laser power in 100 mW increments.
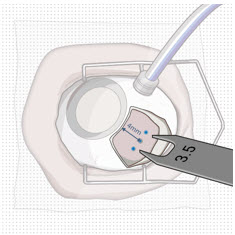
- Once laser ablation of pars plana is completed, remeasure the entire length (including corners) of the scleral incision with 3.5 mm gauge to confirm the final post-laser incision is 3.5 mm. If final incision is greater than 3.5 mm, as indicated by a loose fit/side to side motion of 3.5 mm gauge, place a suture through the wound opposite the relaxing incision to reduce incision down to 3.5 mm.
 Caution
A final post-laser incision length of 3.5 mm provides a secure fit for the implant.
Do not enlarge the scleral dissection beyond 3.5 mm as a final incision length greater than 3.5 mm may result in an improperly seated implant and will require additional suturing.
5. Perform pars plana incision
|
|
| 6. Withdraw the insertion tool handle with filled implant | |
|
|
7. Stabilize the globe
| |
8. Orient the implant
|
|
|
9. Insert the implant
|
|
10. Release the implant
|
|
|
11. Seat the implant
| |
12. Suture Tenon's capsule and conjunctiva
| |


13. Remove infusion cannula
- If the infusion was previously turned on, then set the infusion pressure to 20 mmHg before removing the infusion cannula.
- Check for persistent leaks at the infusion cannula site and suture if necessary.
14. Check Intraocular Pressure (IOP)
- Using digital palpation, check the IOP. If necessary, inject additional fluid to restore IOP.
15. Check implant placement
- Perform indirect ophthalmoscopy to confirm implant position and to examine for the presence of any complications.
Disposal and Post-insertion Procedures
1. Dispose of used Susvimo components and tools
- Do not recap the needle or detach it from the syringe. Dispose of the used Susvimo components and tools in a sharps disposal container or in accordance with local requirements.
2. Perform post-insertion procedures
- Post-insertion procedures are consistent with standard post-surgical procedures.
3. Post-insertion patient instructions
Provide the patient with the following post-operative instructions:
- Positioning:
- –
- Keep head above shoulder level for the rest of the day.
- –
- Sleep with head elevated on 3 or more pillows if lying down during the day and night after implant insertion.
- Information on caring for the eye after the procedure, including but not limited to the following:
- –
- Do not remove the eye shield until they are instructed to do so by their physician. At bedtime, continue to wear the eye shield for at least 7 nights following implant insertion.
- –
- Administer all post-operative eye medications, as directed by their physician.
- –
- Do not push on the eye, rub the eye, or touch the region of the eye where the implant is located (underneath the eyelid in the upper and outer part of the eye) for 30 days following implant insertion. Avoid rubbing the eye or touching the area where the implant is located as much as possible at all other times but if necessary to do so, make sure hands are cleaned prior to touching the eye.
- –
- Do not participate in strenuous activities until 1 month after implant insertion or after discussion with their physician.
- Monitor for symptoms that may require immediate medical attention while the implant is in place.
- MR Conditional information:
- –
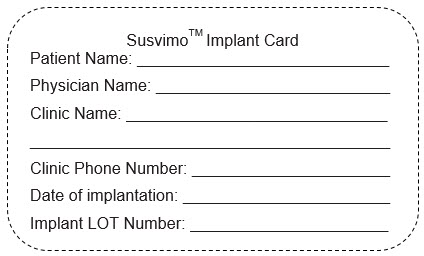
- The surgeon should inform the patient that the implant is MR Conditional (as noted on their Susvimo implant card) and if patient needs to undergo an MRI, they should let their doctor know they have Susvimo implanted in their eye.
- –
- After implant insertion, the surgeon should give the patient the implant card (enclosed in this IFU on the last page) with the appropriate information filled in, and should advise the patient to keep the card in a safe place, e.g. his or her wallet, for future reference. The surgeon should advise the patient that this implant card contains important information related to the Susvimo implant and that the card should be shown to their current and future health care providers.
Explanation of symbols on product or package labeling
| Symbol | Title |
|---|---|
 | Manufacturer |
 | Prescription only |
 | Do not re-use |
 | Do not use if package is damaged |
 | Consult Instructions for Use |
 | Sterilized by irradiation |
 | Sterilized using ethylene oxide |
 | Temperature limit |
 | Expiration date/Use by date |
 | Lot/Batch number |
 | MR Conditional |
 |
| Note - The Implant LOT number can be found on the carton and blister tray of the Susvimo™ Insertion Tool Assembly |
|
|
Manufactured by:
Genentech, Inc.
A Member of the Roche Group
1 DNA Way
South San Francisco, CA 94080-4990
U.S. License No.: 1048
SUSVIMO is a trademark of Genentech, Inc.
©2021 Genentech, Inc. All rights reserved.
This Instructions for Use has been approved by the U.S. Food and Drug Administration.
Approved: 4/2022
Susvimo™
(ranibizumab injection)
For Susvimo ocular implant use
Instructions for Use
| Implant Removal Procedure |
Caution: Federal Law (USA) restricts this device to sale by or on the order of a physician.
Susvimo procedures should be performed by an ophthalmologist experienced in vitreoretinal surgery.
Refer to the Susvimo (ranibizumab injection) 100 mg/mL prescribing information for a complete list of indications, contraindications, warnings, precautions, and adverse events.
Contents
Introduction
| 3 | Device Description |
| 3 | Components |
| 4 | Intended Use/ Indications for Use |
| 4 | Warnings |
| 4 | Precautions |
| 5 | How Supplied, Handling, and Storage |
Instructions for Use
| 6 | Introduction and Materials |
| 7 | Preparatory Procedures |
| 8 | Implant Removal |
| 16 | Disposal and Post-removal Procedures |
| 17 | Explanation of symbols on product or package labeling |
Introduction
These instructions include only the implant removal procedure for the Susvimo implant. Refer to the Susvimo Instructions for Use for the initial fill and implant procedure and prescribing information for the refill-exchange procedure.
Device Description
Susvimo is an intraocular drug delivery system designed to be used specifically with Susvimo (ranibizumab injection) 100 mg/mL.
These Instructions for Use describe the required materials and steps necessary for removal of the Susvimo implant.
Components
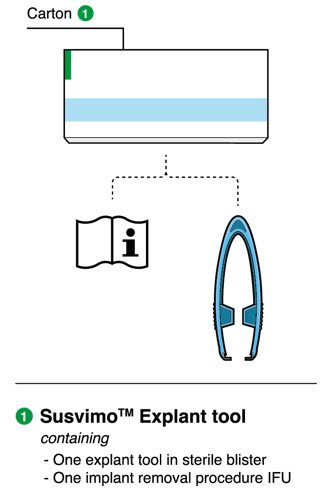 |
| Figure 1
Susvimo components for implant removal procedure |
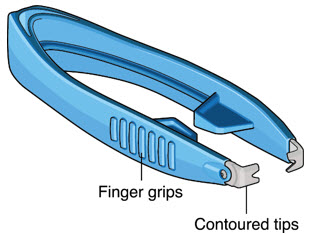
Susvimo explant tool
Susvimo explant tool (Figure 2) is a pair of forceps with contoured tips, which are designed to grasp underneath the implant flange to securely engage the implant during removal.
 |
| Figure 2
Susvimo explant tool |
Intended Use/ Indications for Use
Susvimo explant tool is approved for use with Susvimo ocular implant. Refer to the Susvimo (ranibizumab injection) prescribing information for a complete list of indications, contraindications, warnings, precautions, and adverse events.
Warnings
- Do not use if the sterility has been compromised or the contents have been dropped, damaged or tampered with.
- Do not grasp the implant by the short axis of the implant flange. Remove the implant in a gentle manner. Perpendicular exit of the implant is important to avoid contact between the implant and intraocular structures such as the lens.
Precautions
- Read and follow all instructions, warnings, and cautions prior to use.
- Susvimo procedures should be performed by an ophthalmologist experienced in vitreoretinal surgery.
- Use Susvimo components and materials as specified in these instructions to perform the implant removal procedure.
How Supplied, Handling, and Storage
- Susvimo explant tool has been electron beam sterilized. Do not reprocess or resterilize.
- Susvimo explant tool is for single-use only. Do not reuse the Susvimo explant tool.
- Do not open sealed tray until time of use.
- Do not use if the package is damaged or broken as sterility may be compromised.
- Do not use past the expiration date printed on the label.
- Susvimo explant tool should be stored at a room temperature 15°C to 25°C (59°F to 77°F).
Instructions for Use
Introduction and Materials
Removal of the Susvimo implant requires a surgical procedure that is performed in an operating room.
Materials List
Materials that are required and provided for the procedure are listed in Table 1.
| Item Description |
|---|
| Susvimo explant tool |
Materials required but not provided are listed in Table 2.
| Item Description |
|---|
| Surgical microscope |
| Vitrectomy surgical control system |
| Standard 25 G or 27 G vitrectomy set up |
| Standard vitrectomy tray (including 0.12 straight toothed forceps and blunt wescott scissors) |
| Cauterization equipment (including standard fine tip diathermy and eraser tip wet-field cautery) |
| Ophthalmic broad-spectrum microbicide solution |
| Surgical scalpel blade #15 |
| Non-absorbable sutures for sclera (suggested Nylon) |
| Gut or Vicryl sutures for conjunctival tissues (suggested 7-0 to 9-0: monofilament recommended) |
| Indirect ophthalmoscope and lens |
| Drapes |
Preparatory Procedures
1. Inspect and open sterile packaging
- Prior to use in the operating room, inspect the sterile packaging of the explant tool for damage.
- Check the expiration date printed on the label.
- Open sterile packaging and using aseptic technique, remove the explant tool from the tray.
- Inspect the explant tool and place onto sterile surface.
 Warning
Do not use if the sterility has been compromised or the contents have been dropped, damaged, or tampered with.
2. Patient Preparation
- Dilate the pupil of the eye.
- Place the patient in a supine position on the operating table.
- Implant removal is a surgical procedure and therefore requires sterile controls (i.e. use of ophthalmic broad-spectrum microbicide solution on eye including lids and lashes and draping) be in place to minimize the risk of ocular infection.
- Perform the procedure under local anesthesia using either peribulbar, retrobulbar, or sub-Tenon's technique.
- Place lid speculum.
Implant Removal
Perform the implant removal procedure under the microscope. Consider placing a traction suture for better visualization of the superotemporal quadrant throughout the entire implant removal procedure.
1. Place infusion line
- Place an infusion cannula in the inferotemporal quadrant via an angled entry wound.
- Attach the infusion line, however keep the infusion off.
2. Perform conjunctival peritomy
- Create at least a 6 mm by 6 mm peritomy of the conjunctiva and Tenon's capsule around the implant flange (Figure 3).
 |
| Figure 3
Conjunctival peritomy |
3. Remove fibrous capsule covering implant
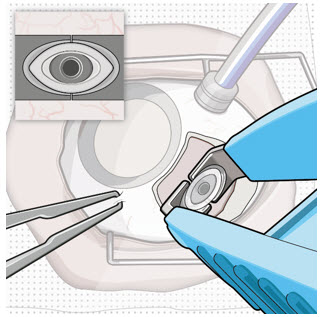
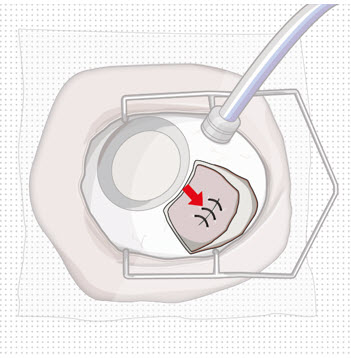
- Remove any fibrous capsule or scar tissue that may have formed over the implant flange and septum (Figure 4 and Figure 5).
- –
- To expose the implant, use a scalpel to make an incision in the tissue around the entire circumference of the implant (Figure 4).
- –
- Use forceps to carefully dissect the implant flange and neck from the surrounding tissue so that the edges of the flange are completely exposed and the implant is free of any adherent tissue (Figure 5).
 |
| Figure 4
Incision to remove tissue that may be covering the implant flange and septum |
 |
| Figure 5
Exposed implant |
4. Stabilize the globe and align the explant tool
- Stabilize the globe with forceps to prevent unwanted eye movement.
- With the explant tool oriented perpendicular to the globe, align the contoured tips with the long axis of the implant flange (Figure 6).
 |
| Figure 6
Align the explant tool along the long axis of the implant flange |
5. Grasp the implant
 Warning
Do not grasp the implant by the short axis of the implant flange. Remove the implant in a gentle manner. Perpendicular exit of the implant is important to avoid contact between the implant and intraocular structures such as the lens.
- Use the contoured tips of the explant tool to gently grasp underneath the long axis of the implant flange (Figure 7).
 |
| Figure 7
Grasp underneath the long axis of the implant flange |
6. Remove the implant
- Once the implant is secured in the explant tool, in a gentle manner pull the implant from the eye in a perpendicular motion to avoid contact with adjacent intraocular structures.
- During removal, use forceps to stabilize the globe and provide counter traction to help release the surrounding tissue (Figure 8).
- During removal, continue to maintain perpendicular orientation of the implant relative to the globe (Figure 9).
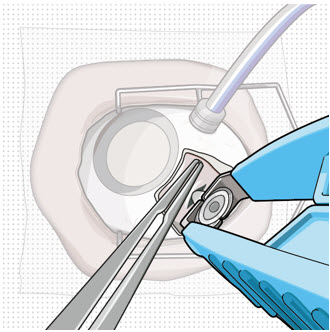
Figure 8
Implant removal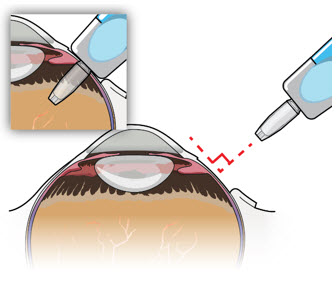
Figure 9
Perpendicular exit of the implant - If needed per the surgeon's discretion, the infusion line on the vitrectomy surgical system can be turned on during implant removal.
- Control any scleral or conjunctival bleeding, using cauterization if needed, and clear any vitreous prolapse present within or around the scleral wound using a vitrectomy setup.
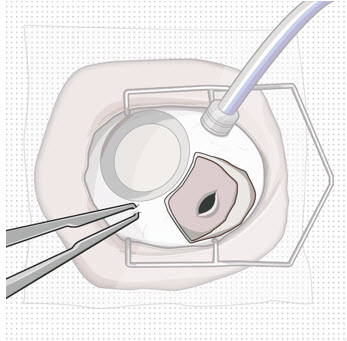
Figure 10
Appearance of the scleral wound after implant removal
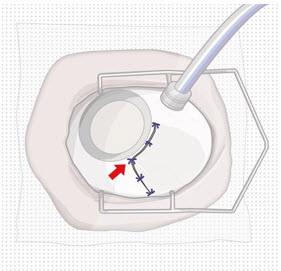
7. Suture the sclera
- Completely close the scleral incision with non-absorbable (suggested Nylon) sutures (Figure 11). More than one suture will be needed to close the wound. It is recommended to place equally spaced partial thickness interrupted sutures.
- Ensure that the knots are buried.
 Caution
Do not overtighten the scleral sutures, to minimize excessive tensions on the sclera or cornea.
 |
| Figure 11
Suture scleral wound using multiple sutures |
8. Suture conjunctiva
- Close Tenon's capsule and conjunctiva to completely cover the scleral incision (Figure 12).
 Caution
Completely close Tenon's capsule and conjunctiva to minimize potential post-removal complications.
 |
| Figure 12
Suture conjunctiva post-removal |
9. Remove infusion cannula
- If the infusion was previously turned on, then set the infusion pressure to 20 mmHg before removing the infusion cannula.
- Place suture at infusion cannula site as needed.
10. Check Intraocular Pressure (IOP) using digital palpation
11. Perform indirect ophthalmoscopy to examine for the presence of any complications
Disposal and Post-removal Procedures
1. Dispose of the used components
- Dispose of the used explant tool together with the implant in a biohazard waste container or in accordance with local requirements.
2. Perform post-removal procedures
- Post-removal procedures are consistent with standard post-surgical procedures.
3. Post-removal patient instructions
- Provide the patient with the following post-operative instructions:
- –
- Positioning:
- Keep head above shoulder level for the rest of the day.
- Sleep with head elevated on 3 or more pillows if lying down during the day and night after implant removal.
- –
- Information on caring for the eye after the procedure, including but not limited to:
- Monitor for symptoms that may require immediate attention.
- Wear an eye shield at bedtime for at least 7 nights.
- Do not participate in strenuous activities until 14 days following the implant removal procedure.
- Administer all post-operative anti-inflammatory and antimicrobial drops, as directed by their physician.
Explanation of symbols on product or package labeling
| Symbol | Title |
|---|---|
 | Manufacturer |
 | Prescription only |
 | Do not re-use |
 | Do not use if package is damaged |
 | Consult Instructions for Use |
 | Sterilized by irradiation |
 | Temperature limit |
 | Expiration date/ Use by date |
 | Lot/Batch number |
Manufactured by:
Genentech, Inc.
A Member of the Roche Group
1 DNA Way
South San Francisco, CA 94080-4990
U.S. License No.: 1048
SUSVIMO is a trademark of Genentech, Inc.
©2021 Genentech, Inc.
All rights reserved.
This Instructions for Use has been approved by the U.S. Food and Drug Administration.
Approved: 10/2021
Representative sample of labeling (see the HOW SUPPLIED section for complete listing):
PRINCIPAL DISPLAY PANEL - Kit Carton
NDC 50242-078-55
Susvimo™
(ranibizumab injection)
See instructions for use
included with the
Susvimo ocular implant
with insertion tool assembly
100 mg/mL
Vial contains 10 mg/0.1 mL ranibizumab
For use with Susvimo ocular implant
Dispense the enclosed Medication Guide to each patient.
Carton contents:
- One Susvimo single-dose vial
- One Susvimo initial fill needle
Rx only
Genentech
10233586