Label: CPDA-1 BLOOD COLLECTION SYSTEM- blood collection system solution


- NDC Code(s): 53157-730-92
- Packager: Haemonetics Corporation
- Category: HUMAN PRESCRIPTION DRUG LABEL
Drug Label Information
Updated July 27, 2023
If you are a healthcare professional or from the pharmaceutical industry please visit this version.
- Download DRUG LABEL INFO: PDF XML
- Official Label (Printer Friendly)
-
DESCRIPTION
CPDA-1 Blood Collection Set with Sampling System
Instruction for Use for Systems Containing a Y Sampling Site (YSS) or Sample Diversion Pouch (with or without a pre-attached Samp Lok® Vacuum Tube Holder). Refer to unit foil package label for specific product description being used.
Sterile, nonpyrogenic fluid path. Sterilized by steam.
Rx only.
This product is free of natural rubber latex.
- INDICATIONS AND USAGE
- WARNINGS
-
GENERALPRECAUTIONS
Use Aseptic Technique.
Use only if solution is clear.
If preparing a platelet concentrate, the platelet-rich plasma should be separated from the red blood cells within 8 hours after blood collection.
If preparing fresh frozen plasma, separate from the red blood cells and place in the freezer at -18 °C or colder within 8 hours after collection.
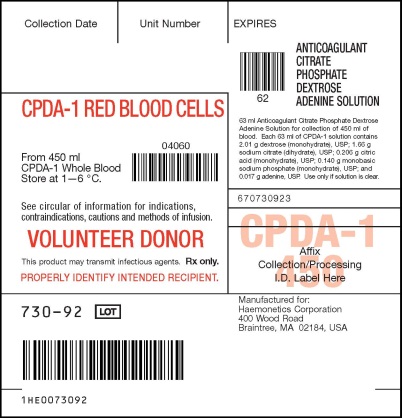
Store CPDA-1 preserved red blood cells at 1—6 °C for up to 35 days and use as indicated.
* During processing, always observe the following precautions:
1. Sealing should be done in a manner that avoids fluid splatter.
2. Always dispose of blood-contaminated products in a manner consistent with established BIOHAZARD safety procedures.
- ADVERSE REACTIONS
-
I. BLOOD COLLECTION INSTRUCTIONS FOR SYSTEMS CONTAINING A Y SAMPLING SITE (YSS) ONLY
1. Load blood agitation device or suspend blood bag on donor scale and adjust donor scale to desired collection gross weight as per manufacturer's instructions.
2. Clamp donor tubing between the Donor Care® Needle Guard (DCNG) and Y Sampling Site.
3. Secure donor tubing above the Y connector and disinfect site of phlebotomy.
4. If using blood pressure cuff, inflate to not more than 60 mm Hg.
5. Remove donor needle cover and accomplish phlebotomy.
6. Release clamp and ensure there is blood flow. Reduce pressure as required.
7. Slide the DCNG midway over the needle hub and securely tape DCNG to the donor's arm as close to the top of the DCNG as possible. Note: If blood flow is slow, slide DCNG away from the needle hub, adjust and re-engage DCNG. If repeated needle adjustment is necessary, slide DCNG away from the needle hub and re-engage at the end of blood collection.
8. Collect appropriate volume of blood into collection bag, as indicated on packaging.
Note: Mix blood and anticoagulant frequently during collection, for example, once every 45 seconds, and immediately after collection. If blood agitation device is used, follow manufacturer's operating instructions.
9. After required amount of blood has been collected, seal donor tubing between Y Sampling Site and the collection bag.*
10. For blood sampling, remove the Y Sampling Site needle cover. Ensure the protective sheath is in place over the sampling needle.
11. Fasten the vacuum tube holder on to the base of the sampling needle.
12. Collect blood samples into vacuum tubes.
13. Ensure the vacuum tubes are centered within the vacuum tube holder during sample collection.
14. Maintain forward pressure on the vacuum tubes during sample collection.
Note: After the last tube is collected, it is recommended that the vacuum tube holder be left in place.
15. After blood samples are collected, clamp donor tubing between the Y Sampling Site and DCNG, as close as possible to the DCNG.
16. Release any remaining pressure from the donor's arm.
17. DCNG must be held stationary while the needle is withdrawn into it. While holding sides of DCNG near the front, grasp the tubing below the clamp and pull the needle into the DCNG until it locks into place, and the needle hub engages the bottom of the DCNG.
18. Insert the DCNG into the vacuum tube holder. Note: It is recommended that the DCNG be inserted securely into the vacuum tube holder prior to discarding.
19. Seal donor tubing adjacent to DCNG.* Detach and discard needle, DCNG, Y Sampling Site and tubing.*
20. Strip tubing between seal and collection bag.
21. Continue to “Processing Instructions”, Section IV, Step 1.
-
II. BLOOD COLLECTION INSTRUCTION FOR SYSTEMS CONTAINING A SAMPLE DIVERSION POUCH WITH OR WITHOUT A PRE-ATTACHED SAMP
LOK® VACUUM TUBE HOLDER
When using systems with a pre-attached Samp Lok vacuum tube holder, follow instructions as noted below, but refer to Section III when indicated to do so.
1. Load blood agitation device or suspend blood bag on donor scale and adjust donor scale to desired collection gross weight as per manufacturer's instructions.
2. Clamp donor tubing between the Donor Care® Needle Guard (DCNG) and Sampling Site.
3. Secure donor tubing above the Y connector and disinfect site of phlebotomy.
4. If using blood pressure cuff, inflate to not more than 60 mm Hg.
5. Remove donor needle cover and accomplish phlebotomy.
6. Release clamp and ensure there is blood flow.
7. Slide the DCNG midway over the needle hub and securely tape DCNG to the donor's arm as close to the top of the DCNG as possible. Note: If blood flow is slow, slide DCNG away from the needle hub, adjust and re-engage DCNG. If repeated needle adjustment is necessary, slide DCNG away from the needle hub and re-engage at the end of blood collection.
8. The donor blood will be automatically diverted to the sample diversion pouch. Once the sample diversion pouch is filled, close clamp immediately on tubing between the sample diversion pouch and Y connector. Warning: To avoid risk of air embolism to donor, do not squeeze sample diversion pouch while tubing is open.
9. Open snap-open closure between the Y connector and the collection bag to initiate blood collection. Reduce pressure as needed.
10. Permanently seal tubing between the sample diversion pouch and the Y connector to maintain sterility of the system prior to collecting blood samples.* Note: When using systems with a pre-attached Samp Lok vacuum tube holder, go to Section III.
11. For blood sampling, remove the Sampling Site needle cover. Ensure the protective sheath is in place over the sampling needle.
12. Fasten the vacuum tube holder on to the base of the sampling needle.
13. Position the sample diversion pouch downwards so that the air rises to the top of the pouch and away from the vacuum tube holder. Note: Drawing air into the vacuum tube may cause hemolysis.
14. Collect blood samples from the sample diversion pouch into vacuum tubes within approximately four minutes to avoid possible clot formation.
15. Ensure the vacuum tubes are centered within the vacuum tube holder during sample collection.
16. Maintain forward pressure on the vacuum tubes during sample collection.
Note: After the last tube is collected, it is recommended that the vacuum tube holder be left in place.
17. Collect appropriate volume of blood into collection bag as indicated on packaging.
Note: Mix blood and anticoagulant frequently during collection, for example, once every 45 seconds, and immediately after collection. If blood agitation device is used, follow manufacturer's operating instructions.
18. After required amount of blood has been collected, seal donor tubing close to snap open closure.*
19. Clamp donor tubing between the Y connector and DCNG, as close as possible to the DCNG.
20. Release any remaining pressure from the donor's arm.
21. DCNG must be held stationary while the needle is withdrawn into it. While holding sides of DCNG near the front, grasp the tubing below the clamp and pull the needle into the DCNG until it locks into place, and the needle hub engages the bottom of the DCNG.
22. Insert the DCNG into the vacuum tube holder, if desired. Note: It is recommended that the DCNG be inserted securely into the vacuum tube holder prior to discarding.
23. Seal donor tubing adjacent to DCNG.* Detach and discard needle, DCNG, sample diversion pouch and tubing.*
24. Strip tubing between seal and collection bag.
25. Continue to "Processing Instructions", Section IV, Step 1.
-
III. WHEN USING SYSTEMS WITH A PRE-ATTACHED SAMP
LOK® VACUUM TUBE HOLDER
1. To collect blood samples, open lid from Samp Lok vacuum tube holder.
2. Open snap-open closure between sample diversion pouch and Samp Lok vacuum tube holder.
3. Position the sample diversion pouch downwards so that the air rises to the top of the pouch and away from the Samp Lok vacuum tube holder. Note: Drawing air into the vacuum tube may cause hemolysis.
4. Collect blood samples from the sample diversion pouch into vacuum tubes within approximately four minutes to avoid possible clot formation.
5. Ensure the vacuum tubes are centered within the Samp Lok vacuum tube holder during sample collection.
6. Maintain forward pressure on the vacuum tubes during sample collection.
7. The lid may be closed on the Samp Lok vacuum tube holder after sample collection.
8. Return to Section II, Step 17. Note: When collection of unit is complete and the donor needle is engaged in the DCNG, open the lid of the Samp Lok vacuum tube holder and insert the DCNG into the holder. Twist until it locks into place. An audible click will confirm that it is locked.
-
IV. PROCESSING INSTRUCTIONS
1. If desired, seal at or adjacent to "X" marks on the tubing to provide numbered segments of anticoagulated blood for typing or crossmatching.*
2. Load whole blood and remaining bags into centrifuge cup, ensuring that the tubing stays in the top half of the cup.
3. Centrifuge at conditions designed to produce desired components.
4. Carefully remove the unit from the centrifuge and place the collection bag in the plasma expressor.
5. Clamp tubing to extra satellite bag(s), if present.
6. Gently apply expressor pressure.
7. Open snap-open closure on collection bag and express plasma.
8. After plasma is expressed, clamp tubing between satellite bag(s) whole blood bag and release expressor pressure.
9. Seal tubing and detach the bag containing packed red cells, and set aside plasma for further processing.*
10. Gently mix packed red cells.
11. Store CPDA-1 preserved red blood cells at 1—6 °C for up to 35 days and use as indicated.
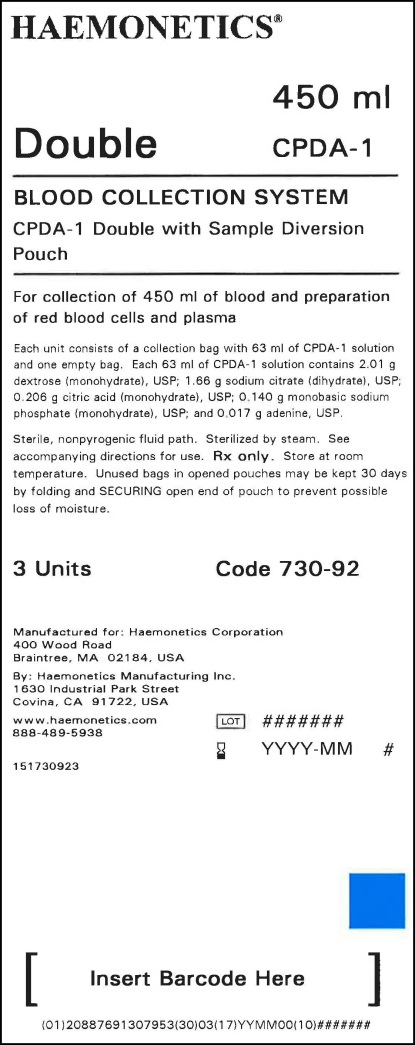
- HOW SUPPLIED
-
REFERENCES
HAEMONETICS and THE Blood Management Company are trademarks of Haemonetics Corporation.
DonorCare and SampLok are registered trademarks of ITL Corporation, Canberra, Australia.
Manufactured for:
Haemonetics Corporation
400 Wood Road
Braintree, MA 02184, USA
By: Haemonetics Manufacturing Inc.
1630 Industrial Park Street
Covina, CA 91722, USA
www.haemonetics.com
800-537-2802
IFU P/N 147130924
- PACKAGE/LABEL PRINCIPAL DISPLAY PANEL
-
INGREDIENTS AND APPEARANCE
CPDA-1 BLOOD COLLECTION SYSTEM
blood collection system solutionProduct Information Product Type HUMAN PRESCRIPTION DRUG Item Code (Source) NDC:53157-730 Route of Administration INTRAVENOUS Active Ingredient/Active Moiety Ingredient Name Basis of Strength Strength DEXTROSE MONOHYDRATE (UNII: LX22YL083G) (ANHYDROUS DEXTROSE - UNII:5SL0G7R0OK) DEXTROSE MONOHYDRATE 2.01 g in 63 mL SODIUM CITRATE (UNII: 1Q73Q2JULR) (ANHYDROUS CITRIC ACID - UNII:XF417D3PSL, SODIUM CATION - UNII:LYR4M0NH37) SODIUM CITRATE 1.66 g in 63 mL CITRIC ACID MONOHYDRATE (UNII: 2968PHW8QP) (ANHYDROUS CITRIC ACID - UNII:XF417D3PSL) ANHYDROUS CITRIC ACID 0.206 g in 63 mL SODIUM PHOSPHATE, MONOBASIC, MONOHYDRATE (UNII: 593YOG76RN) (PHOSPHATE ION - UNII:NK08V8K8HR, SODIUM CATION - UNII:LYR4M0NH37) SODIUM PHOSPHATE, MONOBASIC, MONOHYDRATE 0.14 g in 63 mL ADENINE (UNII: JAC85A2161) (ADENINE - UNII:JAC85A2161) ADENINE 0.017 g in 63 mL Packaging # Item Code Package Description Marketing Start Date Marketing End Date 1 NDC:53157-730-92 24 in 1 CARTON 1 63 mL in 1 BAG; Type 0: Not a Combination Product Marketing Information Marketing Category Application Number or Monograph Citation Marketing Start Date Marketing End Date NDA BN800077 11/06/1980 Labeler - Haemonetics Corporation (057827420) Establishment Name Address ID/FEI Business Operations Haemonetics Manufacturing Inc 078598396 manufacture(53157-730)