Label: ADSOL RED CELL PRESERVATION (anticoagulant citrate phosphate dextrose- cpd and adsol preservation kit

- NDC Code(s): 0942-6508-04
- Packager: Fenwal, Inc.
- Category: HUMAN PRESCRIPTION DRUG LABEL
- DEA Schedule: None
- Marketing Status: New Drug Application
Drug Label Information
Updated October 23, 2020
If you are a consumer or patient please visit this version.
- Download DRUG LABEL INFO: PDF XML
- Official Label (Printer Friendly)
-
BLOOD-PACK UNIT
Blood-Pack Unit with an Integral Bioflex RC Leukocyte Reduction Filter Using CPD/Adsol Red Cell Preservation Solution for Whole Blood Collection and Filtration of Red Blood Cells
Contains Sample Diversion System for the collection of unanticoagulated whole blood samples for laboratory testing.
Integral filter unit intended for leukocyte reduction of AS-1 red blood cells:
- At ambient temperature up to 8 hours after blood collection.
- At refrigerated temperature up to 3 days after blood collection if AS-1 red blood cells are prepared within 3 days after whole blood collection.
The leukocyte reduced red blood cells may then be stored for the maximum allowable dating period.
Instructions for Use
Collection Procedure:
Use aseptic technique.
Notes:
- If sample diversion system is not used, donor samples may be collected using an alternative method following standard procedures.
- Nominal tubing dimensions of product are 0.118" inner diameter x 0.025" wall thickness.
Precautions:
- Upon removal of Blood-Pack Unit from the clear plastic overwrap, visually inspect the unit.
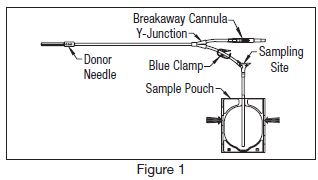
- Do not use the product if the in-line cannula is broken and/or anticoagulant is present in the sample pouch or in the tubing from the in-line cannula to the sample pouch and donor needle (see Figure 1). Note that condensation in the empty tubing of the Blood-Pack Unit is expected as a result of the sterilization process.
- Do not use unless the solutions are clear.
1. Identify Blood-Pack Unit using appropriate donor identification system.
2. Adjust donor scale to desired collection weight and position primary container on the donor scale as far as possible below donor arm.
3. Clamp donor tubing between needle and Y-junction with a clamp. (This step may be performed prior to step 1 or 2.)
4. Visually inspect the tubing from the in-line cannula to the sample pouch and donor needle, as well as the sample pouch to reconfirm that there is no anticoagulant present.
Note: Ensure that the sample pouch remains below the donor’s arm.
5. Following blood center procedures, apply pressure to donor’s arm and disinfect site of venipuncture.
6. Remove needle cover per instructions below:
a) Holding the hub and cover near the tamper-evident seal, twist cover and hub in opposite directions to break seal.
b) Remove needle cover, being careful not to drag the cover across the needle point.
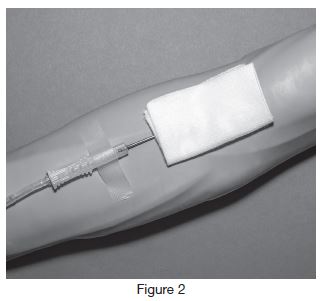
7. Following blood center procedures, perform venipuncture, appropriately secure donor needle and/or tubing and release clamp on donor tubing. When good blood flow is established, stabilize the front of the needle guard to arm with tape (see Figure 2).
8. Allow the sample pouch to fill with blood according to center procedure. Monitor blood flow into sample pouch.
Notes:
- The sample pouch contains an average fill volume of approximately 53 mL with a maximum fill volume of approximately 60 mL when filled to capacity.
- If less blood sample volume is required, the flow to the sample pouch may be stopped prior to completely filling the pouch. For example, in order to target a fill volume of approximately 40 mL, fill to the level indicated by the arrows in Figure 1. Ensure the pouch is hanging vertically.
- The tube leading from the Y-junction to the sample pouch contains an additional volume of approximately 2 mL.
Precautions:
- Do not elevate or squeeze the sample pouch as this could cause blood to backflow from the sample pouch into the collection system.
- Once the sample pouch is filled to desired volume, complete steps 9 – 17 within approximately 4 minutes to avoid possible clot formation in the tubing and/or sample pouch.
9. Close the blue clamp on tubing between the Y-junction and the sample pouch.
10. Break the in-line cannula below the Y-junction in the donor tubing to the primary container allowing blood collection to proceed. To completely break the in-line cannula, grasp with both hands. Snap it at a 90° angle in one direction, and then bend it at a 90° angle in the opposite direction. Ensure the in-line cannula is completely broken and that the blood flows freely to the primary container.
Precaution: Failure to break the in-line cannula completely may result in restricted blood flow.
11. Mix blood and anticoagulant in the primary container immediately, at several intervals during collection, and immediately after collection.
12. Following blood center procedures, hermetically seal the tubing between the sampling site and the Y-junction to maintain sterility of the blood collection system prior to removing blood samples.
Warning:
- Do not proceed with the remaining steps until the tubing leading to the sample pouch is hermetically sealed between the sampling site and the Y-junction. To maintain the whole blood collection container as a closed system, the tubing between the sample pouch and Y-junction must be hermetically sealed prior to inserting the access device into the sampling site. Failure to do so may lead to contamination of the whole blood collection.
13. To collect samples, insert the access device by pushing firmly into the sampling site until the membrane seal is penetrated.
Note: If the access device is assembled such that the outer barrel is screwed onto the Luer, make sure to rotate clockwise upon insertion to avoid barrel detaching from Luer.
14. Open the cap on the access device (if applicable). Hold access device so that the sample pouch hangs down.
15. Directly align the vacuum sample tube with the internal needle in the access device. Insert vacuum sample tube into device until the stopper is punctured.
16. Allow vacuum sample tube to fill with blood then remove from the access device.
17. Repeat steps 15 and 16 until the desired number of vacuum sample tubes have been filled.
Notes:
- If the access device needs to be replaced, clamp the tubing between the sampling site and the sample pouch. Then grasp base of sampling site with one hand and pull the access device out with the other hand. Firmly insert the new access device. Remove clamp and continue sampling.
- If the access device is assembled such that the outer barrel is screwed onto the Luer, make sure to rotate clockwise upon removal to avoid barrel detaching from Luer.
- The access device can only be replaced one time.
Precaution: When replacing access device, be careful to avoid contact with any blood droplets on the Luer or sampling site. Discard used access device appropriately.
18. Collect the appropriate volume based on Blood-Pack Unit used.
Note:The volume of anticoagulant is sufficient for the blood collection indicated on Blood-Pack Unit ± 10%.
Precaution: Once the desired blood volume is collected, complete steps 19 – 23 within approximately 4 minutes to avoid possible clot formation in the tubing.
19. Release pressure on donor’s arm. If appropriate, apply clamp to donor tubing between needle and the Y-junction.
20. Hermetically seal donor tubing between the in-line cannula and the primary container.
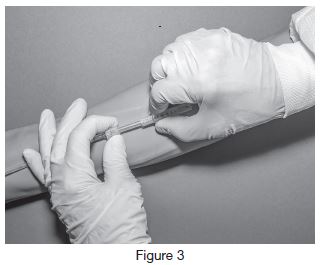
21. Withdrawal of Needle (see Figure 3).
Precaution: The needle guard must be held stationary while the needle is withdrawn into it.
a) Place folded sterile gauze over puncture site and hold in place with finger tip without exerting pressure.
b) Hold sides of needle guard near the front, between the index finger and thumb. Pull the hub back smoothly until the needle is completely enclosed and securely locked into the needle guard.
c) Confirm the needle is completely enclosed and securely locked into the needle guard.
22. Remove and discard the sample diversion system and needle guard into an appropriate biohazardous waste container following established procedures. If donor tubing is also to be discarded, hermetically seal donor tubing directly above the primary container and remove.
Note:Step 23 may be performed prior to step 22 if desired.
23. If the donor tubing is not hermetically sealed directly above the primary container, then strip the blood from the remaining donor tubing into the primary container and mix. If desired, allow tubing to refill.
Component Preparation:
Notes:
- If a platelet concentrate is to be prepared, it should be separated within 8 hours after blood collection.
- Fresh frozen plasma should be separated from the red blood cells and placed in the freezer at -18°C or colder within 8 hours after blood collection.
- Adsol red cell preservation solution should be added to the red blood cells immediately after the removal of plasma. Preparation of AS-1 red blood cells may vary depending on processing option selected:
a) Within 8 hours of blood collection if whole blood is held at ambient temperature.
b) Within 3 days of blood collection if whole blood is refrigerated.
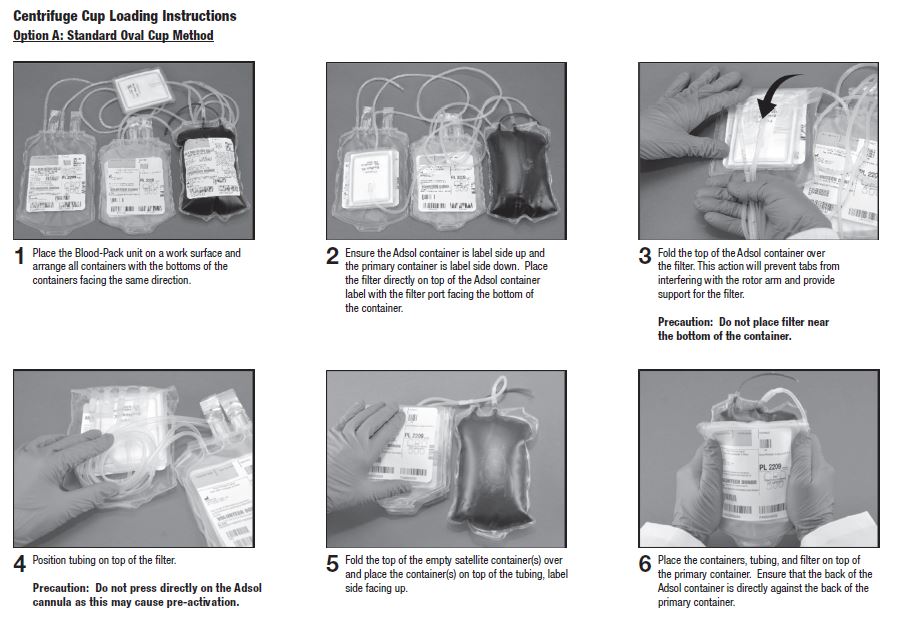
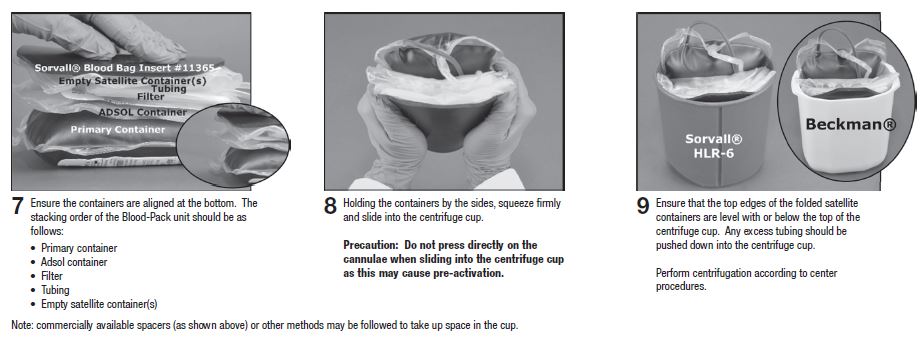
24. At the appropriate time, prepare the Blood-Pack Unit with integral filter for centrifugation.
25. Thoroughly mix the primary container end over end.
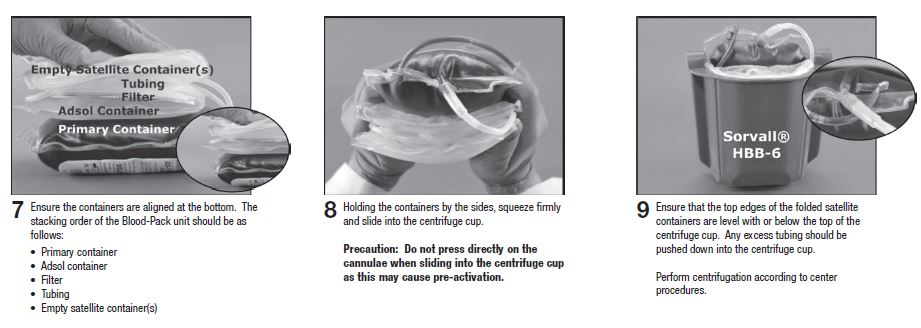
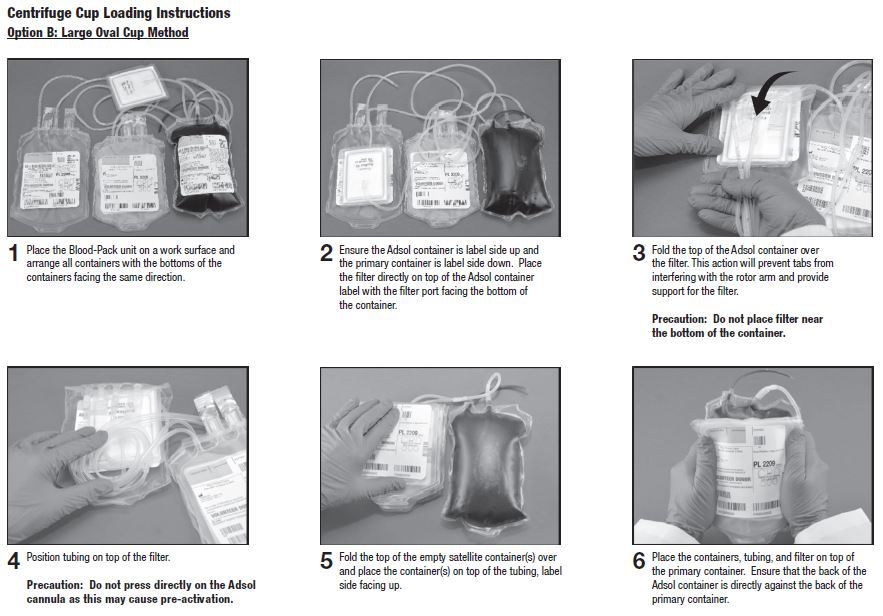
26. Load the Blood-Pack Unit into a centrifuge cup per the instructions on page 3 or 4.
Page 3 describes Option A, the method of centrifuge cup loading when using standard oval centrifuge cups.
Page 4 describes Option B, the method of centrifuge cup loading when using large oval centrifuge cups. This method differs from Option A in steps 7 – 9 only and shows the use of a blood bag insert to help fill extra space inside the cup.
Notes:
-This guide is one method for centrifuge cup loading and applies to all Bioflex RC configurations. The specific stacking order and methods may vary depending on te workstation setup, centrifuge equipment, and your facilities Standard Operating Procedures.
-It is important to pack the filter properly in the centrifugation cup to avoid damage to the filter during centrifugation.
-Do not place the filter in the lower half of the centrifuge cup. See step 3 on page 3 or 4 for proper placement of filter.
-Do not press directly on the cannulae while performing any of the cup loading steps as this may cause pre-activation of the cannulae
27. After loading the Blood-Pack unit into the centrifuge cup, perform centrifugation according to center procedures.
28. Following centrifugation, remove containers from the centrifuge cup taking care not to disturb the red blood cell / plasma interface.29. Place primary container in a plasma extractor and apply pressure. Clamp off tubing above the filter to prevent plasma flow into filter during plasma transfer. If applicable, clamp off tubing below Y-Junction leading to secondary Transfer-Pack container not to be filled with plasma. Open the cannula on the top of the primary container to transfer plasma into the empty Transfer-Pack container.
30. When the desired amount of plasma has been removed, clamp the tubing between the plasma container and the Y-connector closest to the plasma container and release pressure on the primary container. Seal and remove satellite container(s).
31. Suspend the Adsol red cell preservation solution container ensuring that the primary container remains below the level of the filter during prime. Open the cannula on the Adsol solution container and remove the clamp between the primary container and the filter. Allow the Adsol to drain through the filter into the primary container. Clamp the tubing between the filter and the primary container after prime is complete.
32. Mix the Adsol red cell preservation solution and red cells thoroughly.
Note:If the Adsol red cell preservation solution is not added to the red cells, ensure appropriate labeling of the red cell container. Also ensure that tubing with unique segment numbers are attached as the primary container does not include tubing with segment numbers. Manufacture of CPD Red Cells for transfusion must include proper labeling of the container as well as attached tubing with unique segment numbers. A CPD red cell without Adsol red cell preservation solution may be stored between 1 and 6ºC up to 21 days after collection. The attached Bioflex RC filter should not be used to leukoreduce a CPD red cell without Adsol red cell preservation solution.
Filtration Procedure:
Precaution: Red blood cell products collected from certain donors may have extended filtration times and the potential for ineffective filtration and leukoreduction.
33. Mix unfiltered AS-1 red blood cells thoroughly. Invert the unfiltered AS-1 red blood cells and hang the filter set such that the filter remains vertical. Filtration may be performed from 165 cm up to full length. To achieve maximum flow rate, allow the set to hang to full length. The storage container must remain below the level of the filter during filtration.
34. Filtration must be initiated up to 8 hours after collection at ambient condition or up to 3 days at refrigerated temperature.
35. Inspect all tubing to ensure it hangs freely without kinks.
36. Remove the clamp above the filter to start filtration.
Note: Manual or mechanical pressure should not be used to increase the flow rate through the filter. Tubing below the filter should not be stripped at any time during the filtration process.
Note:If filtration of red cells is initiated at ambient temperature, the filtration process can be completed at either ambient or refrigerated temperature prior to storing the red cells between 1 and 6°C. However, for optimal filtration time, it is recommended to complete the filtration at ambient temperature.
37. When filtration is complete, air can be observed in the inlet side of the filter. Hermetically seal and detach the tubing below the filter.
38. Make segments from the post filter tubing and leave segments attached to the filtered red cell storage container. (QC samples may be prepared by thoroughly mixing the filtered red cells and stripping this tubing prior to sealing the segments.)
39. Store the AS-1 red blood cells, leukocytes reduced between 1 and 6°C.
40. Infuse the red cells within 42 days of collection.
41. Percent red blood cell recovery should be determined per FDA Guidance entitled “Guidance for Industry – Pre-Storage Leukocyte Reduction of Whole Blood and Blood Components Intended for Transfusion”, current issue.
Warning: Failure to achieve closed system processing conditions negates the extended storage claim and the red blood cell product must be transfused within 24 hours.
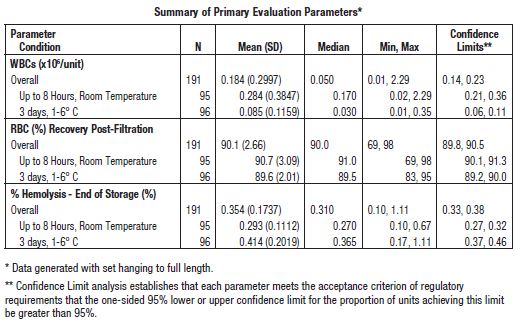
Clinical Studies:Data table below represents a summary of data generated under study protocol LERF-003-CMD. These data summarize Fenwal Bioflex RC filter performance under defined conditions of product usage.
Store at Controlled Room Temperature. Protect from freezing. Avoid excessive heat.
Definition of “Controlled Room Temperature”:
“A temperature maintained thermostatically that encompasses the usual and customary working environment of 20° to 25°C (68° to 77°F); that results in a mean kinetic temperature calculated to be not more than 25°C; and that allows for excursions between 15°C and 30°C (59° and 86°F) that are experienced in pharmacies, hospitals, and warehouses. Provided the mean kinetic temperature remains in the allowed range, transient spikes up to 40°C are permitted as long as they do not exceed 24 hours ... The mean kinetic temperature is a calculated value that may be used as an isothermal storage temperature that simulates the non isothermal effects of storage temperature variations.”
Reference: United States Pharmacopeia, General Notices. United States Pharmacopeial Convention, Inc. 12601 Twinbrook Parkway, Rockville, MD.

Fenwal, Inc.Lake Zurich, IL 60047 USA
1-800-933-6925
©2019 Fenwal, Inc. All rights reserved.
FENWAL, Blood-Pack, Transfer Pack, Adsol, and Bioflex RC are trademarks of Fenwal, Inc.
Sorvall is a trademark og Thermo Fisher Scientific LLC.
Beckman is trademark of Beckman Coulter, Inc.
07-19-13-427 REV: A
-
PACKAGE LABEL.PRINCIPAL DISPLAY PANEL
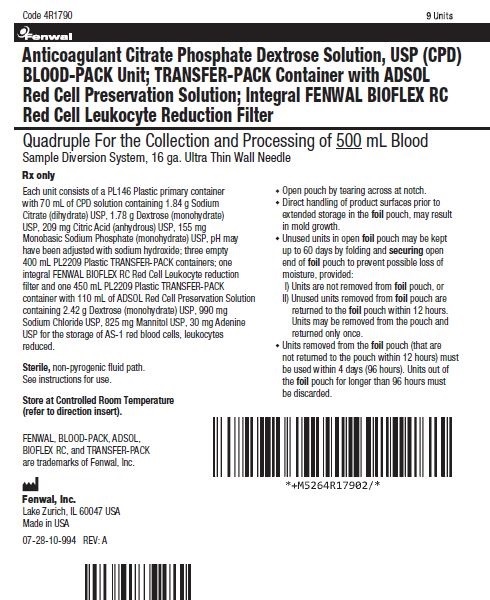
4R1790
9 Units
Fenwal
Anticoagulant Citrate Phosphate Dextrose Solution, USP (CPD) BLOOD-PACK Unit; TRANSFER-PACK Container with ADSOL Red Cell Preservation Solution; Integral FENWAL BIOFLEX RC Red Cell Leukocyte Reduction Filter
Quadruple For the Collection and Processing of 500 mL Blood
Sample Diversion System, 16 ga. Ultra Thin Wall Needle
Rx only
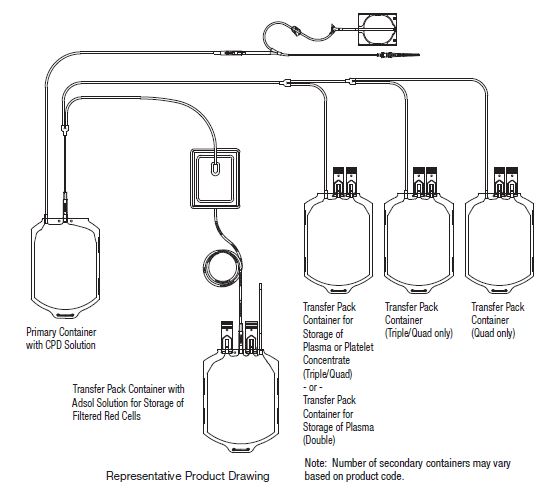
Each unit consists of a PL146 Plastic primary container with 70 mL of CPD solution containing 1.84 g Sodium Citrate (dihydrate) USP, 1.78 g Dextrose (monohydrate) USP, 209 mg Citric Acid (anhydrous) USP, 155 mg Monobasic Sodium Phosphate (monohydrate) USP, pH may have been adjusted with sodium hydroxide; three empty 400 mL PL2209 Plastic TRANSFER-PACK containers; one integral FENWAL BIOFLEX RC Red Cell Leukocyte reduction filter and one 450 mL PL2209 Plastic TRANSFER-PACK container with 110 mL of ADSOL Red Cell Preservation Solution containing 2.42 g Dextrose (monohydrate) USP, 990 mg Sodium Chloride USP, 825 mg Mannitol USP, 30 mg Adenine USP for the storage of AS-1 red blood cells, leukocytes reduced.
Sterile, non-pyrogenic fluid path.
See instructions for use.
- Open pouch by tearing across at notch.
- Direct handling of product surfaces prior to extended storage in the foil pouch, may result in mold growth.
- Unused units in open foil pouch may be kept up to 60 days by folding and securing open end of foil pouch to prevent possible loss of moisture, provided:
I) Units are not removed from foil pouch, or
II) Unused units removed from foil pouch are returned to the foil pouch within 12 hours. Units may be removed from the pouch and returned only once.
- Units removed from the foil pouch (that are not returned to the pouch within 12 hours) must be used within 4 days (96 hours). Units out of the foil pouch for longer than 96 hours must be discarded.
FENWAL, BLOOD-PACK, ADSOL, BIOFLEX RC, and TRANSFER-PACK are trademarks of Fenwal, Inc.
Fenwal, Inc.
Lake Zurich, IL 60047 USA
Made in USA
07-28-10-994 REV: A
-
INGREDIENTS AND APPEARANCE
ADSOL RED CELL PRESERVATION
anticoagulant citrate phosphate dextrose (cpd) and adsol preservation kitProduct Information Product Type HUMAN PRESCRIPTION DRUG Item Code (Source) NDC:0942-6508 Packaging # Item Code Package Description Marketing Start Date Marketing End Date 1 NDC:0942-6508-04 1 in 1 KIT; Type 1: Convenience Kit of Co-Package Quantity of Parts Part # Package Quantity Total Product Quantity Part 1 1 BAG 70 mL Part 2 1 BAG 110 mL Part 1 of 2 CPD
citrate phosphate dextrose solutionProduct Information Route of Administration INTRAVENOUS Active Ingredient/Active Moiety Ingredient Name Basis of Strength Strength TRISODIUM CITRATE DIHYDRATE (UNII: B22547B95K) (ANHYDROUS CITRIC ACID - UNII:XF417D3PSL) ANHYDROUS CITRIC ACID 1.84 g in 70 mL DEXTROSE MONOHYDRATE (UNII: LX22YL083G) (ANHYDROUS DEXTROSE - UNII:5SL0G7R0OK) DEXTROSE MONOHYDRATE 1.78 g in 70 mL ANHYDROUS CITRIC ACID (UNII: XF417D3PSL) (ANHYDROUS CITRIC ACID - UNII:XF417D3PSL) ANHYDROUS CITRIC ACID 209 mg in 70 mL SODIUM PHOSPHATE, MONOBASIC, MONOHYDRATE (UNII: 593YOG76RN) (PHOSPHATE ION - UNII:NK08V8K8HR) SODIUM PHOSPHATE, MONOBASIC, MONOHYDRATE 155 mg in 70 mL Inactive Ingredients Ingredient Name Strength SODIUM HYDROXIDE (UNII: 55X04QC32I) Packaging # Item Code Package Description Marketing Start Date Marketing End Date 1 70 mL in 1 BAG; Type 1: Convenience Kit of Co-Package Marketing Information Marketing Category Application Number or Monograph Citation Marketing Start Date Marketing End Date NDA BN811104 02/28/2017 Part 2 of 2 ADSOL RED CELL PRESERVATION
adsol red cell preservation solutionProduct Information Route of Administration INTRAVENOUS Active Ingredient/Active Moiety Ingredient Name Basis of Strength Strength DEXTROSE MONOHYDRATE (UNII: LX22YL083G) (ANHYDROUS DEXTROSE - UNII:5SL0G7R0OK) DEXTROSE MONOHYDRATE 2.42 g in 110 mL SODIUM CHLORIDE (UNII: 451W47IQ8X) (SODIUM CATION - UNII:LYR4M0NH37) SODIUM CHLORIDE 990 mg in 110 mL MANNITOL (UNII: 3OWL53L36A) (MANNITOL - UNII:3OWL53L36A) MANNITOL 825 mg in 110 mL ADENINE (UNII: JAC85A2161) (ADENINE - UNII:JAC85A2161) ADENINE 30 mg in 110 mL Packaging # Item Code Package Description Marketing Start Date Marketing End Date 1 110 mL in 1 BAG; Type 1: Convenience Kit of Co-Package Marketing Information Marketing Category Application Number or Monograph Citation Marketing Start Date Marketing End Date NDA BN811104 02/28/2017 Marketing Information Marketing Category Application Number or Monograph Citation Marketing Start Date Marketing End Date NDA BN811104 02/28/2017 Labeler - Fenwal, Inc. (794519020) Establishment Name Address ID/FEI Business Operations Fenwal International, Inc. 091164590 MANUFACTURE(0942-6508)