Label: LEUCOFLEX CGP- anticoagulant citrate phosphate dextrose solution with additive solution as-1 kit


- NDC Code(s): 14498-002-01
- Packager: Maco Productions
- Category: HUMAN PRESCRIPTION DRUG LABEL
- DEA Schedule: None
- Marketing Status: New Drug Application
Drug Label Information
Updated December 5, 2019
If you are a consumer or patient please visit this version.
- Download DRUG LABEL INFO: PDF XML
- Official Label (Printer Friendly)
-
Description
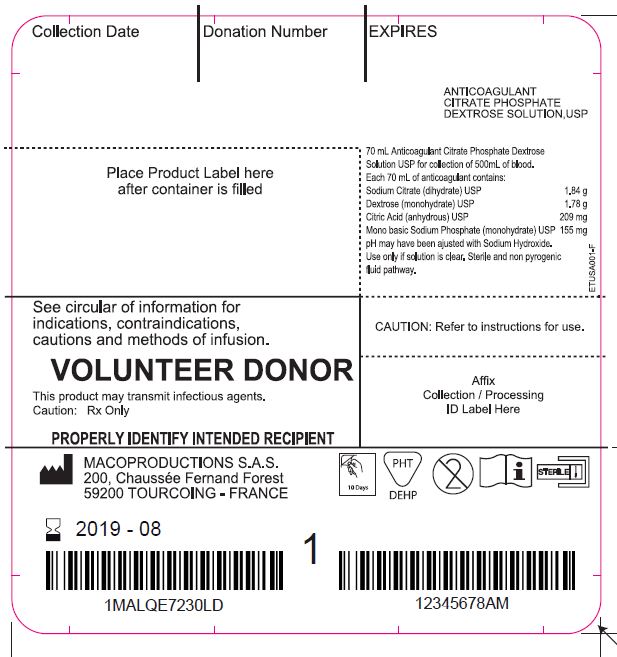
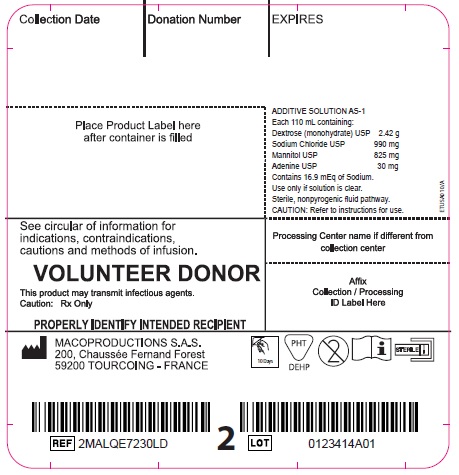
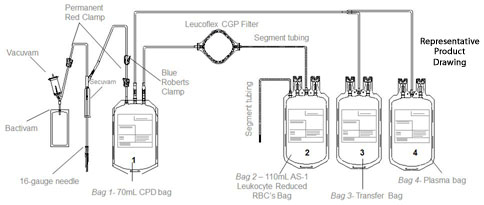
The Leucoflex CGP product consists of a blood collection system with 70ml of CPD for the collection of 500±50ml of blood and 100ml of AS-1 Additive Solution. They are supplied with sterile, non-pyrogenic fluid pathways. The product as supplied includes an in-line leukocyte reduction filter known as Leucoflex CGP, storage containers for blood components and tubing, a sample diversion pouch (Bactivam), a vacuum tube adapter (Vacuvam), and a protective shield for the used needle (Secuvam).
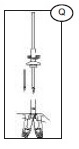
Representative Product Drawing
-
Intended Use
The "Leucoflex CGP Leukocyte Reduction Filter" is intended for the leukocyte reduction of Red Blood Cells prepared from whole blood stored at 1-6°C up to 24 hours after collection. The collection set provides for subsequent preparation of AS-1 Red Blood Cells, leukocytes Reduced (adenine saline added) and plasma in a closed system.
The AS-1 Red Blood Cells, leukocytes Reduced and plasma may then be stored for the maximum allowable dating periods.
-
WARNING
- Avoid contact with sharp objects.
- DO NOT USE if the overwrap or blood bag system shows any signs of deterioration.
- DO NOT USE if the solutions are not clear.
- Dispose of all system components that have been contaminated with blood in a biohazard container as per your institution's SOP.
- Dispose of all sharps as per your institution's SOP.
-
CAUTIONS
- Do not fold or squeeze the Leucoflex CGP filter. Inappropriate handling may adversely affect filtration.
- Check for kinks in the tubing prior to collection and filtration.
- Rx only.
The protective shield for needle Secuvam (A) and the vacuum tube adapter Vacuvam (B) features of the collection set aid in the safe collection of vacuum tube samples from the sample diversion pouch Bactivam (C) and the disposal of donor needles after blood collectin by providing protection from accidental needlestick.
All or part of this medical device is made of PVC plasticized with DEHP. According to some studies, DEHP could potentially be harmful to the reproductive system of male fetuses. The prescriber is solely responsible for choosing to use this device on women who are either pregnant or breast-feeding, or on young male infants. Nevertheless, DEHP-plasticized PVC is in compliance with the European Pharmacopeia.
All manufacturing processes and all components in contact with the donors, the users and the blood components dedicated to the patients are not made with natural rubber latex.


-
COLLECTION AND SAMPLING PROCEDURE
INSTRUCTION FOR USE
Before Donation
1) Peel open the transparent overwrap (D) using the corner flap.
2) Support blood bag system as far as possible below donor arm, ideally on an automated blood mixer.
Note: it is recommended that the primary bag on the mixer lies with the tubing on the lower side of the mixer holding plate.
3) Apply tourniquet or pressure cuff (inflate to approximately 60 mm Hg).
4) Prepare venipuncture site as per your SOP.
5) Ensure that the donor line is not twisted or tangled.
Venipuncture
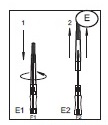
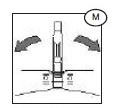
1) Open the needle cap (E1) using the following procedure:
a) Twist the needle cap, thus breaking the seal.
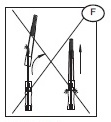
b) Lift the cap off of the needle (E2) in a straight line taking special care not to touch the needle in the process (F). Keep hands behind the needle at all times during set use and disposal.
2) Perform the venipuncture.
3) After the needle has been inserted, introduce the Secuvam onto the hub of the needle.
4) Tape the Secuvam onto the donor's arm.
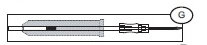
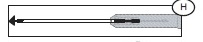
Note: if the Secuvam causes discomfort to the donor or decreases the blood flow because of the angle of the needle, leave the Secuvam on the tubing, behind the needle hub (G) during collection. Secure the needle into the Secuvam at the end of the donation (H).
After Venipuncture
1) Ensure that the clamp between the Bactivam pouch and the donation line is open.
2) Ensure that the Bactivam pouch is held below the level of the venipuncture site, and is supported at all times.
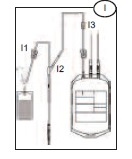
3) Allow blood to run into the Bactivam pouch until the pouch fills (approximately 30ml) (I).
4) Close the red clamp (I1) on the transfer line to the Bactivam pouch, by holding the clamp in one hand and squeezing the two edges together, until it locks (a click may be heard).
Note: the red clamp cannot be opened after it has snapped shut.
5) Break the break-away cannula (I2) on the donor line by holding the cannula in one hand and the plastic Y-junction in the other and snapping the cannula both left and right to ensure a clean break. Allow the donation procedure to continue, ensuring that the blood bag is mixed immediately when blood flows into the primary bag.
Note: This step may be done prior to venipuncture if the Blue Roberts clamp (I3) on the donor line is closed prior to breaking the break-away cannula.
6) If using an automated mixer, open the mixer clamp and start the mixer at this point.
Note: it is recommended that the primary bag on the mixer lies with the tubing on the lower side of the mixer holding plate.
7) After approximately 50 ml of blood enters the primary bag, mix thoroughly (when possible).
Note: Collect the quantity of blood stated on the blood bag label.
Sampling Procedure
Note: this is done during the donation. Avoid air in the collection of sample tubes from the diversion pouch to ensure adequate sample volume and avoid hemolysis.
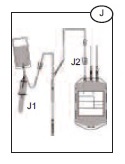
1) Hold the Bactivam pouch with the Vacuvam below it (J), to ensure good blood flow from the pouch to the sampling device, and no introduction of air into the sampling tubes.
2) Remove the cap of the Vacuvam sampling device, and retain for later use (when possible).
3) Introduce a vacuum sampling tube by holding the barrel of the Vacuvam and directing the sample tube cap directly onto the needle inside the device (J1).
4) Blood is drawn automatically into the sampling tube, stopping at the appropriate volume.
5) When the sample tube stops filling, withdraw the tube, ensuring that the tube is pulled out of the barrel in a straight line.
6) Repeat the sampling procedure steps (3 to 5) with all remaining sampling tubes.
7) When all samples have been taken, replace the Vacuvam cap to prevent accidental access to the interior needle (when possible).
8) Mix the blood in the primary bag regularly (approximately every 100 ml or every minute).
After Donation
1) Once the required volume of blood has been collected, close the red clamp on the donor line (J2), at least 12 inches above the primary bag.
Note: if necessary, place a Hemostat on the colletion line just below the Secuvam.
2) Release the pressure cuff or tourniquet, and immediately mix the whole blood in the primary bag.
Note: if the needle was taped to the arm, and not the Secuvam, remove the tape from the needle before pulling the needle into the Secuvam (disregard step 3).
3) Remove the tape holding the Secuvam in place.
4) Remove the needle by gently pulling the needle into the barrel of the Secuvam while supporting the Secuvam with one hand (a click may be heard).
Note: if necessary, step 4 may be done before step 3.
5) Remove and discard the cap (if relevant) from the barrel of the Vacuvam, into an appropriate container.
6) Insert the Secuvam needle protector into the barrel of the Vacuvam sampling device.
7) After removing the blood from the mixer/trip scale, mix the blood unit thoroughly.
8) If the donor line is to be used for quality control, strip the line as per procedure (at least 3 times), heat-seal (place clips) and cut (between the clips), leaving sufficient line for testing purposes.
Note: if it is necessary to strip the donor line, it is recommended to strip within 4 minutes of the end of the donation, in order to avoid introducing clots into the blood bag.
9) Ideally, heat-seal the donor line as close as possible to the pack (~1 inch). Alternatively, place clips close to the blood pack and cut between the clips. Mix thoroughly during and immediately after the procedure.
Note: this is an in-line filter system; there is no need to keep the donor line for cross-matching segments.
10) Remove and discard the donor line (K) with the two red clamps, Blue Roberts clamp, Bactivam, Vacuvam and Secuvam as per SOP.
Note: the completely protected needle after securing the Secuvam inside the rigid Vacuvam sleeve can be disposed of in general biowaste vs. a sharps container.

Opening needle cap

-
COMPONENT PREPARATION GENERAL
CAUTION:
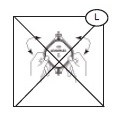
Do not fold or manhandle the filters (L).
Do not apply pressure, either mechanical or human, to increase the flow rate of the filter.- Units with decreased or extended filtration times may not be adequately leukoreduced, and should be evaluated for residual leukocytes and red blood cell recovery before release. Consult training materials for more information on expected length of filtration times and the applicable hold periods in clinical study data.
- Failure to achieve and maintain a closed system throughout processing results in a product that must be stored at 1 to 6 C and transfused within 24 hours.
- The AS-1 additive solution must be added to the red blood cells without delay after the separation of the plasma. Whole blood in CPD alone may be stored at 1 to 6 C for up to 21 days.
- The filter has been designed and validated to meet the criteria of a leukocytes reduction filter for Red Blood Cells. The filter's performance must be validated using your facility's standard operating procedure (SOP) on component preparation and handling. Any filtration that fails to meet the filtration specifications established by the facility's validation should be evaluated for residual leukocytes and red blood cell (RBC) recovery after filtration.
Note that unusual attributes such as sickle cell trait, cold agglutinins, blood clotting and gel formation, and poor mixing during collection and processing of components can contribute to the failure of a filtration to meet filtration specifications. Failure to adequately mix RBC with Additive Solution thoroughly prior to filtration can result in blocked filters.
-
BLOOD COMPONENTS SEPARATION
1) Obtain collected Whole Blood from 1-6 C storage container.
2) Mix the Whole Blood thoroughly.
3) Pack the collection system into a centrifuge as per your facility's standard operating procedure (SOP).
4) Centrifuge the blood, satellite bag, and additive solution bag together under conditions designed to produce a separation of plasma and red blood cells.
5) Place the centrifuged blood carefully into an extractor, and gently release the pressure plate.
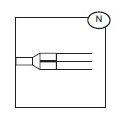
6) Break the break-away cannula (M) on the tubing leading to the plasma bag by bending the cannula with a side-to-side motion.
7) Express Plasma into appropriate container.
8) If preparing Cryoprecipitate AHF (Anti-Hemophilic Factor) from this Plasma, place a temporary clamp between the 'Y' connector (N) and the bag for the final storage of plasma otherwise, add a permanent clamp.
9) If required, express the air from the plasma back into the RBC bag.
10) Heat seal and disconnect the Plasma bag. (If Cryoprecipitate is manufactured heat seal the tubing 1 inch before the Y connector).
Breaking the cannula
-
RED BLOOD CELLS LEUKOCYTES REDUCTION
1) Lift the additive solution (AS-1) bag above the RBC bag on the filtration rack or drip stand.
2) Break the break-away cannula on the RBC bag by bending the cannula with side-to-side motion.
3) Allow the additive solution to drain completely through the Leucoflex CGP filter into the RBCs without delay.
Note: Some additive solution will be left in the filter. DO NOT squeeze the filter in order to maximize the additive transfer to the RBCs.
4) Place a Hemostat on the tubing between the filter and the AS-1 RBCs bag.
5) Thoroughly, mix the AS-1 with the Red Blood Cells.
6) Hang the AS-1 RBCs bag on a filtration rack so that the outlet tubing of the Leucoflex CGP filter and the Leukocyte Reduced (LR) AS-1 RBC bag inlet tubing is fully extended and the LR AS-1 RBCs bag is freely hanging.
7) Remove the Hemostat and allow the blood to flow by gravity through the Leucoflex CGP filter into the LR AS-1 RBCs bag.
Note: Determine the status of the filtration as follows: if there is no blood flowing from below the filter, the filter is flat and the filter media is visible on the inlet side, filtration is complete.
8) Heat seal the segment tubing 1 inch below the Leucoflex CGP filter, and all along the segment tubing between the printed numbers.
9) Disconnect and discard the empty transfer bag, Leucoflex CGP filter, and tubing as per SOP.
10) Store the LR AS-1 Red Blood Cells, at 1-6 C for up to 42 days.
WARNING: if unit is spiked for any reason, storage is limited to 24 hours at 1 to 6 C before transfusion.
NOTE: If either face of the filter remains white, the Red Cell Concentrate has not been leucoreduced and must be discarded.
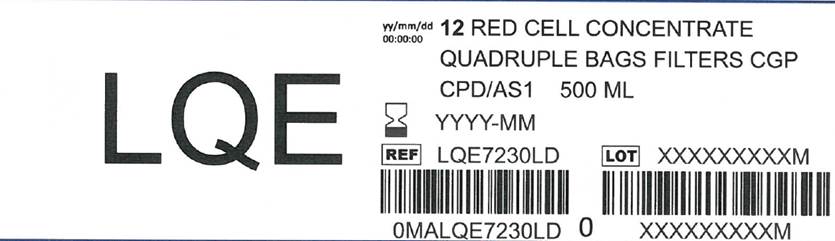
- HANDLING OF PORT PROTECTORS
- LABELS
-
INGREDIENTS AND APPEARANCE
LEUCOFLEX CGP
anticoagulant citrate phosphate dextrose solution with additive solution as-1 kitProduct Information Product Type HUMAN PRESCRIPTION DRUG Item Code (Source) NDC:14498-002 Packaging # Item Code Package Description Marketing Start Date Marketing End Date 1 NDC:14498-002-01 1 in 1 KIT Quantity of Parts Part # Package Quantity Total Product Quantity Part 1 1 BAG 70 mL Part 2 1 BAG 110 mL Part 1 of 2 ANTICOAGULANT CITRATE PHOSPHATE DEXTROSE SOLUTION
anticoagulant citrate phosphate dextrose solution injection, solutionProduct Information Route of Administration INTRAVENOUS Active Ingredient/Active Moiety Ingredient Name Basis of Strength Strength SODIUM CITRATE (UNII: 1Q73Q2JULR) (ANHYDROUS CITRIC ACID - UNII:XF417D3PSL) SODIUM CITRATE 1.84 g in 70 mL DEXTROSE MONOHYDRATE (UNII: LX22YL083G) (ANHYDROUS DEXTROSE - UNII:5SL0G7R0OK) DEXTROSE MONOHYDRATE 1.78 g in 70 mL ANHYDROUS CITRIC ACID (UNII: XF417D3PSL) (ANHYDROUS CITRIC ACID - UNII:XF417D3PSL) ANHYDROUS CITRIC ACID 209 mg in 70 mL SODIUM PHOSPHATE, MONOBASIC, MONOHYDRATE (UNII: 593YOG76RN) (PHOSPHATE ION - UNII:NK08V8K8HR) SODIUM PHOSPHATE, MONOBASIC, MONOHYDRATE 155 mg in 70 mL Packaging # Item Code Package Description Marketing Start Date Marketing End Date 1 70 mL in 1 BAG; Type 0: Not a Combination Product Marketing Information Marketing Category Application Number or Monograph Citation Marketing Start Date Marketing End Date NDA BN040083 Part 2 of 2 ADDITIVE SOLUTION AS-1
additive solution as-1 injection, solutionProduct Information Route of Administration INTRAVENOUS Active Ingredient/Active Moiety Ingredient Name Basis of Strength Strength DEXTROSE MONOHYDRATE (UNII: LX22YL083G) (ANHYDROUS DEXTROSE - UNII:5SL0G7R0OK) DEXTROSE MONOHYDRATE 2.42 g in 110 mL SODIUM CHLORIDE (UNII: 451W47IQ8X) (SODIUM CATION - UNII:LYR4M0NH37) SODIUM CHLORIDE 990 mg in 110 mL MANNITOL (UNII: 3OWL53L36A) (MANNITOL - UNII:3OWL53L36A) MANNITOL 825 mg in 110 mL ADENINE (UNII: JAC85A2161) (ADENINE - UNII:JAC85A2161) ADENINE 30 mg in 110 mL Packaging # Item Code Package Description Marketing Start Date Marketing End Date 1 110 mL in 1 BAG; Type 0: Not a Combination Product Marketing Information Marketing Category Application Number or Monograph Citation Marketing Start Date Marketing End Date NDA BN040083 Marketing Information Marketing Category Application Number or Monograph Citation Marketing Start Date Marketing End Date NDA BN040083 05/31/2013 Labeler - Maco Productions (265492868) Registrant - Maco Productions (265492868) Establishment Name Address ID/FEI Business Operations Maco Productions 265492868 manufacture(14498-002)